DIY bathroom reno, phase 1 - demo tile, ceiling, and walls

bathroom-renovation-p1-hor.jpg

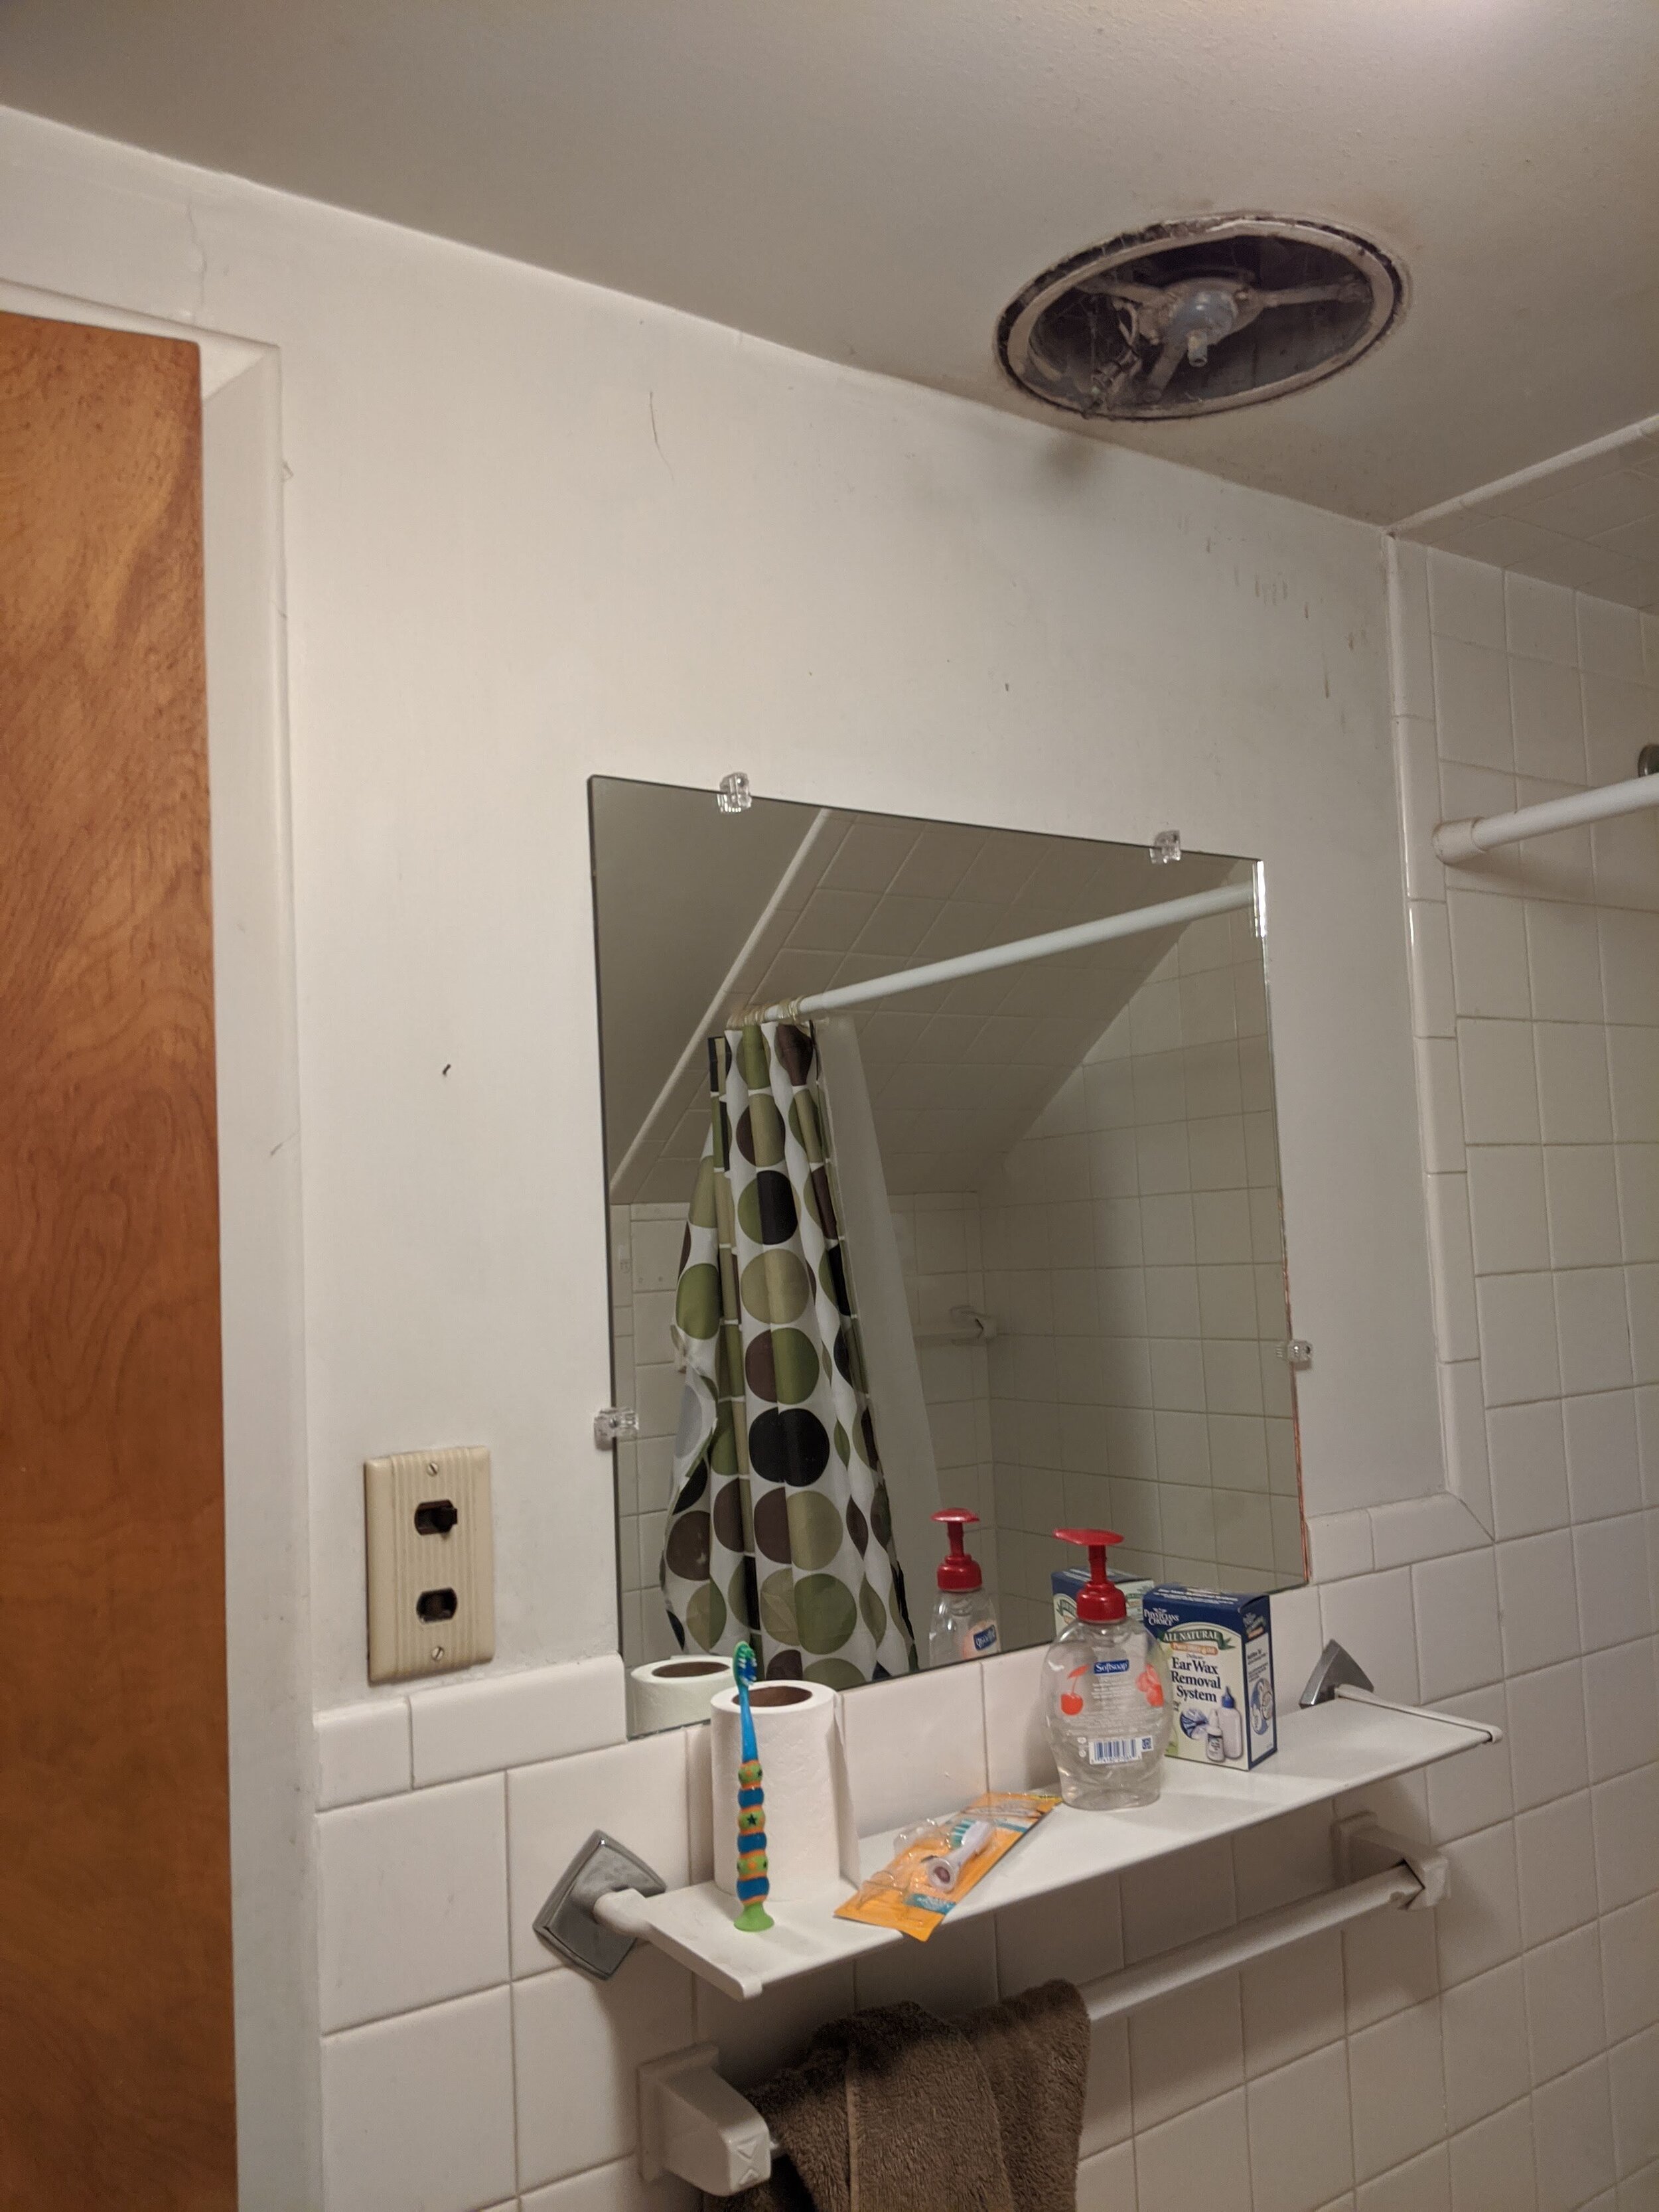
Demo sounds so fun. Demo even starts off fun! But then you’re just really sweaty and itchy with dirt (well, you hope it’s dirt) in your eyes, and looking at a HUGE pile of rubble to carry out.

But this is where it begins. Even if you’re building a cabin in the middle of the prairie, chances are, you’d mow the spot first. It all starts with demo.

So one Friday night, I said, “Yo, hubs, WHEN are we redoing this bathroom? It’s stupid to have a shower you can’t use.”

(Side note, this is similar to how our entire basement renovation project began, except for the shower complaint.)

Next thing I know, my husband was walking up the stairs with goggles and a crowbar.

NOTE: Skip back if you want to see an overview (including “the before”) or skip ahead if you’re looking for a different step in the process.

What’s “doing it right?”

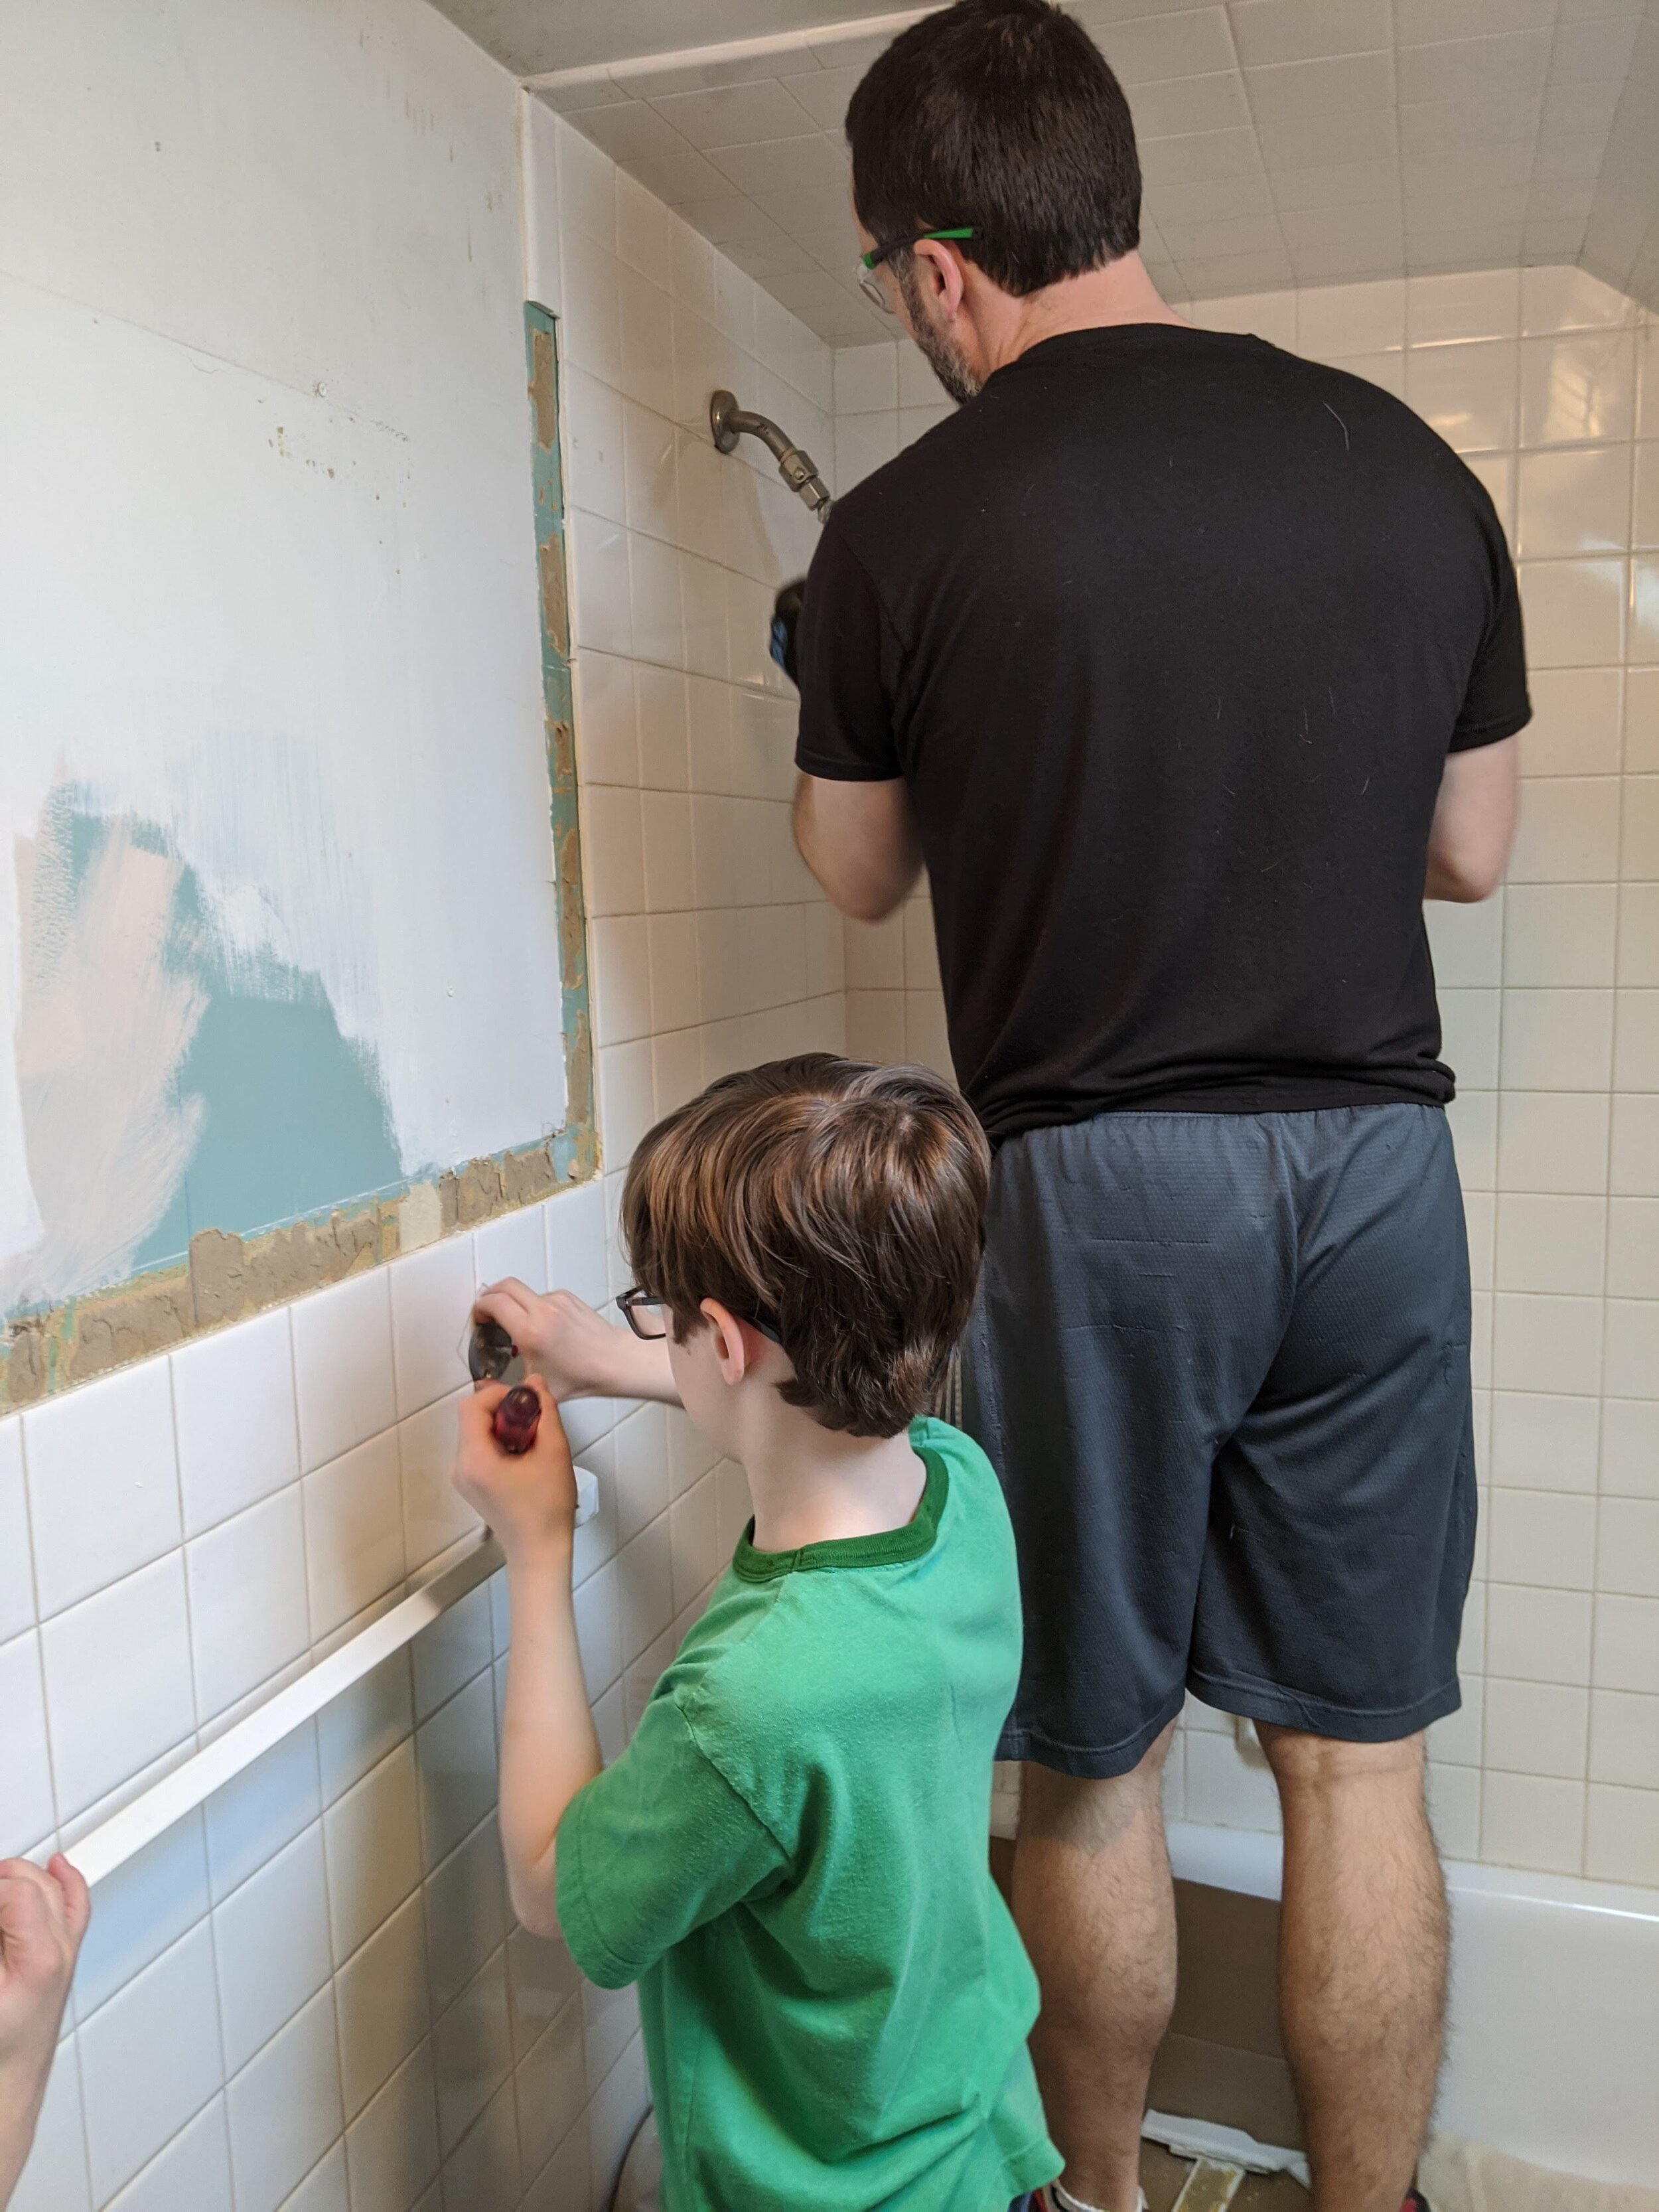
Well, a lot of homeowners probably think “tearing out is the easy part.” And you might be right — it doesn’t require a ton of skill. (Hence why you see my ten-year-old helping.) But it does require good equipment and planning.

My suggestions:

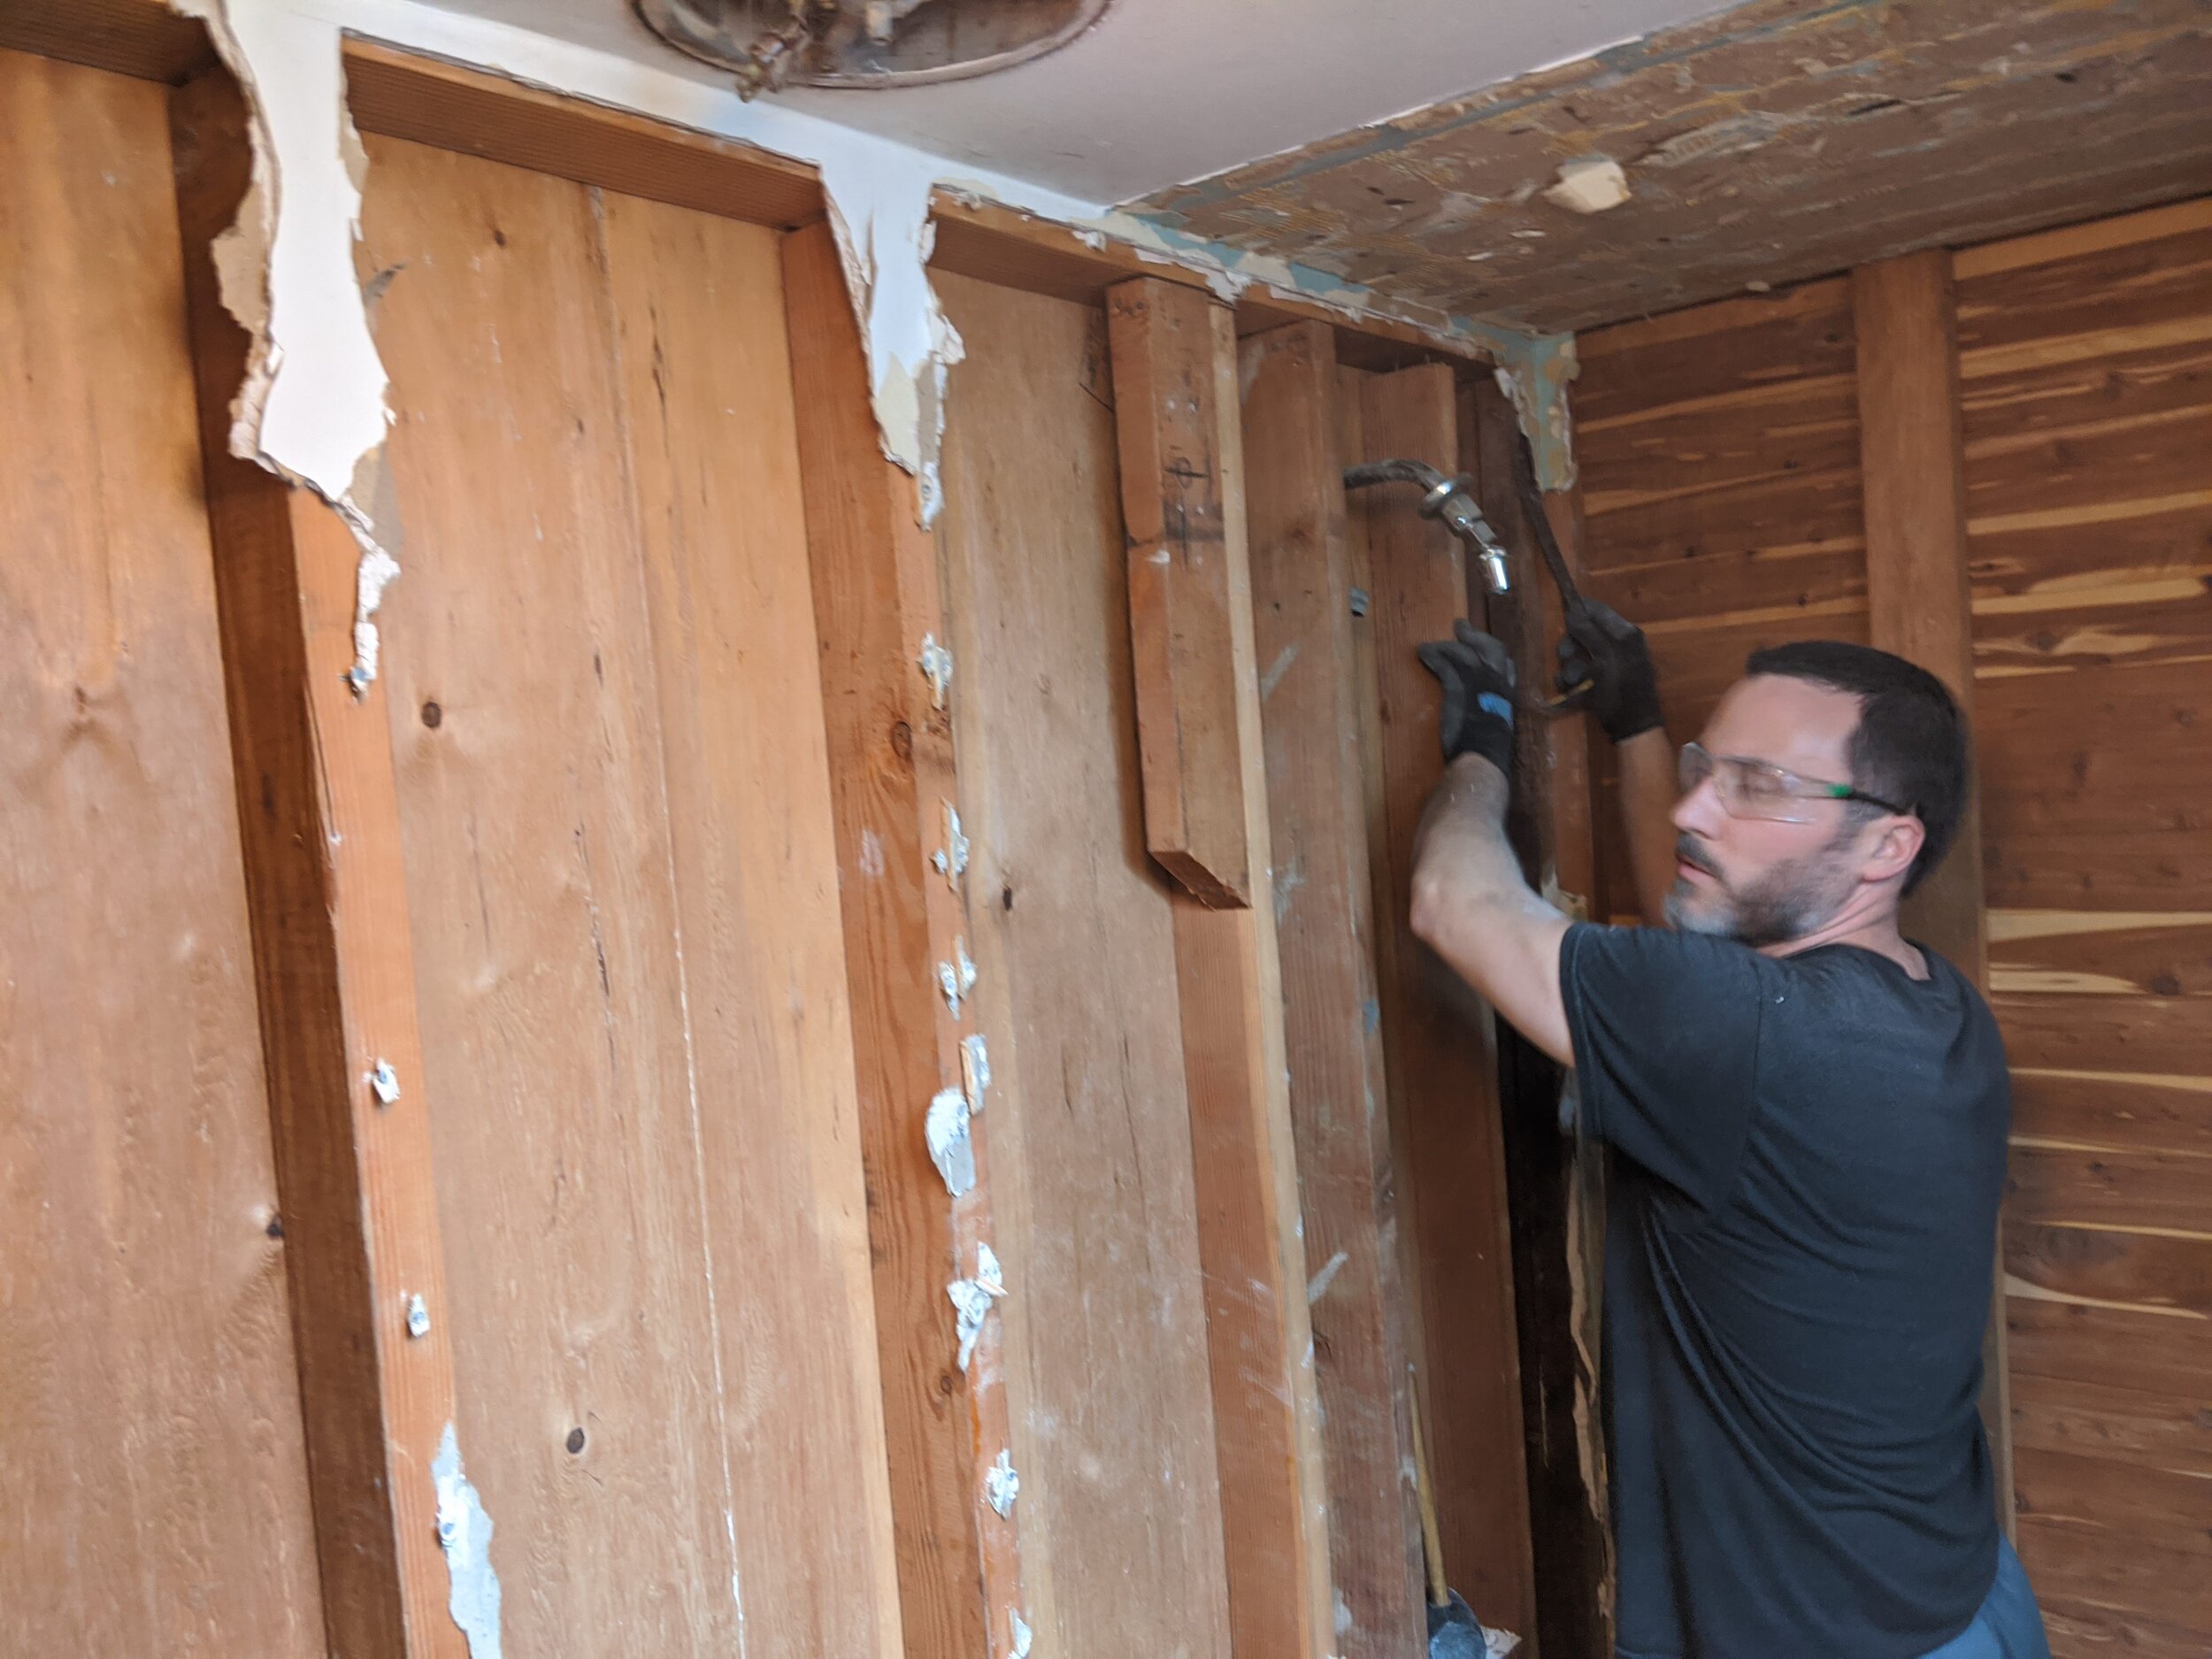
  • You’ll see we are all wearing safety goggles. Do not get this crap in your eyes.

  • For many of the demo (and install) steps, we wore masks. Besides not knowing if you’re unearthing mold, building codes were more lenient in the past. Don’t breathe in something that’s going to make you sick later.

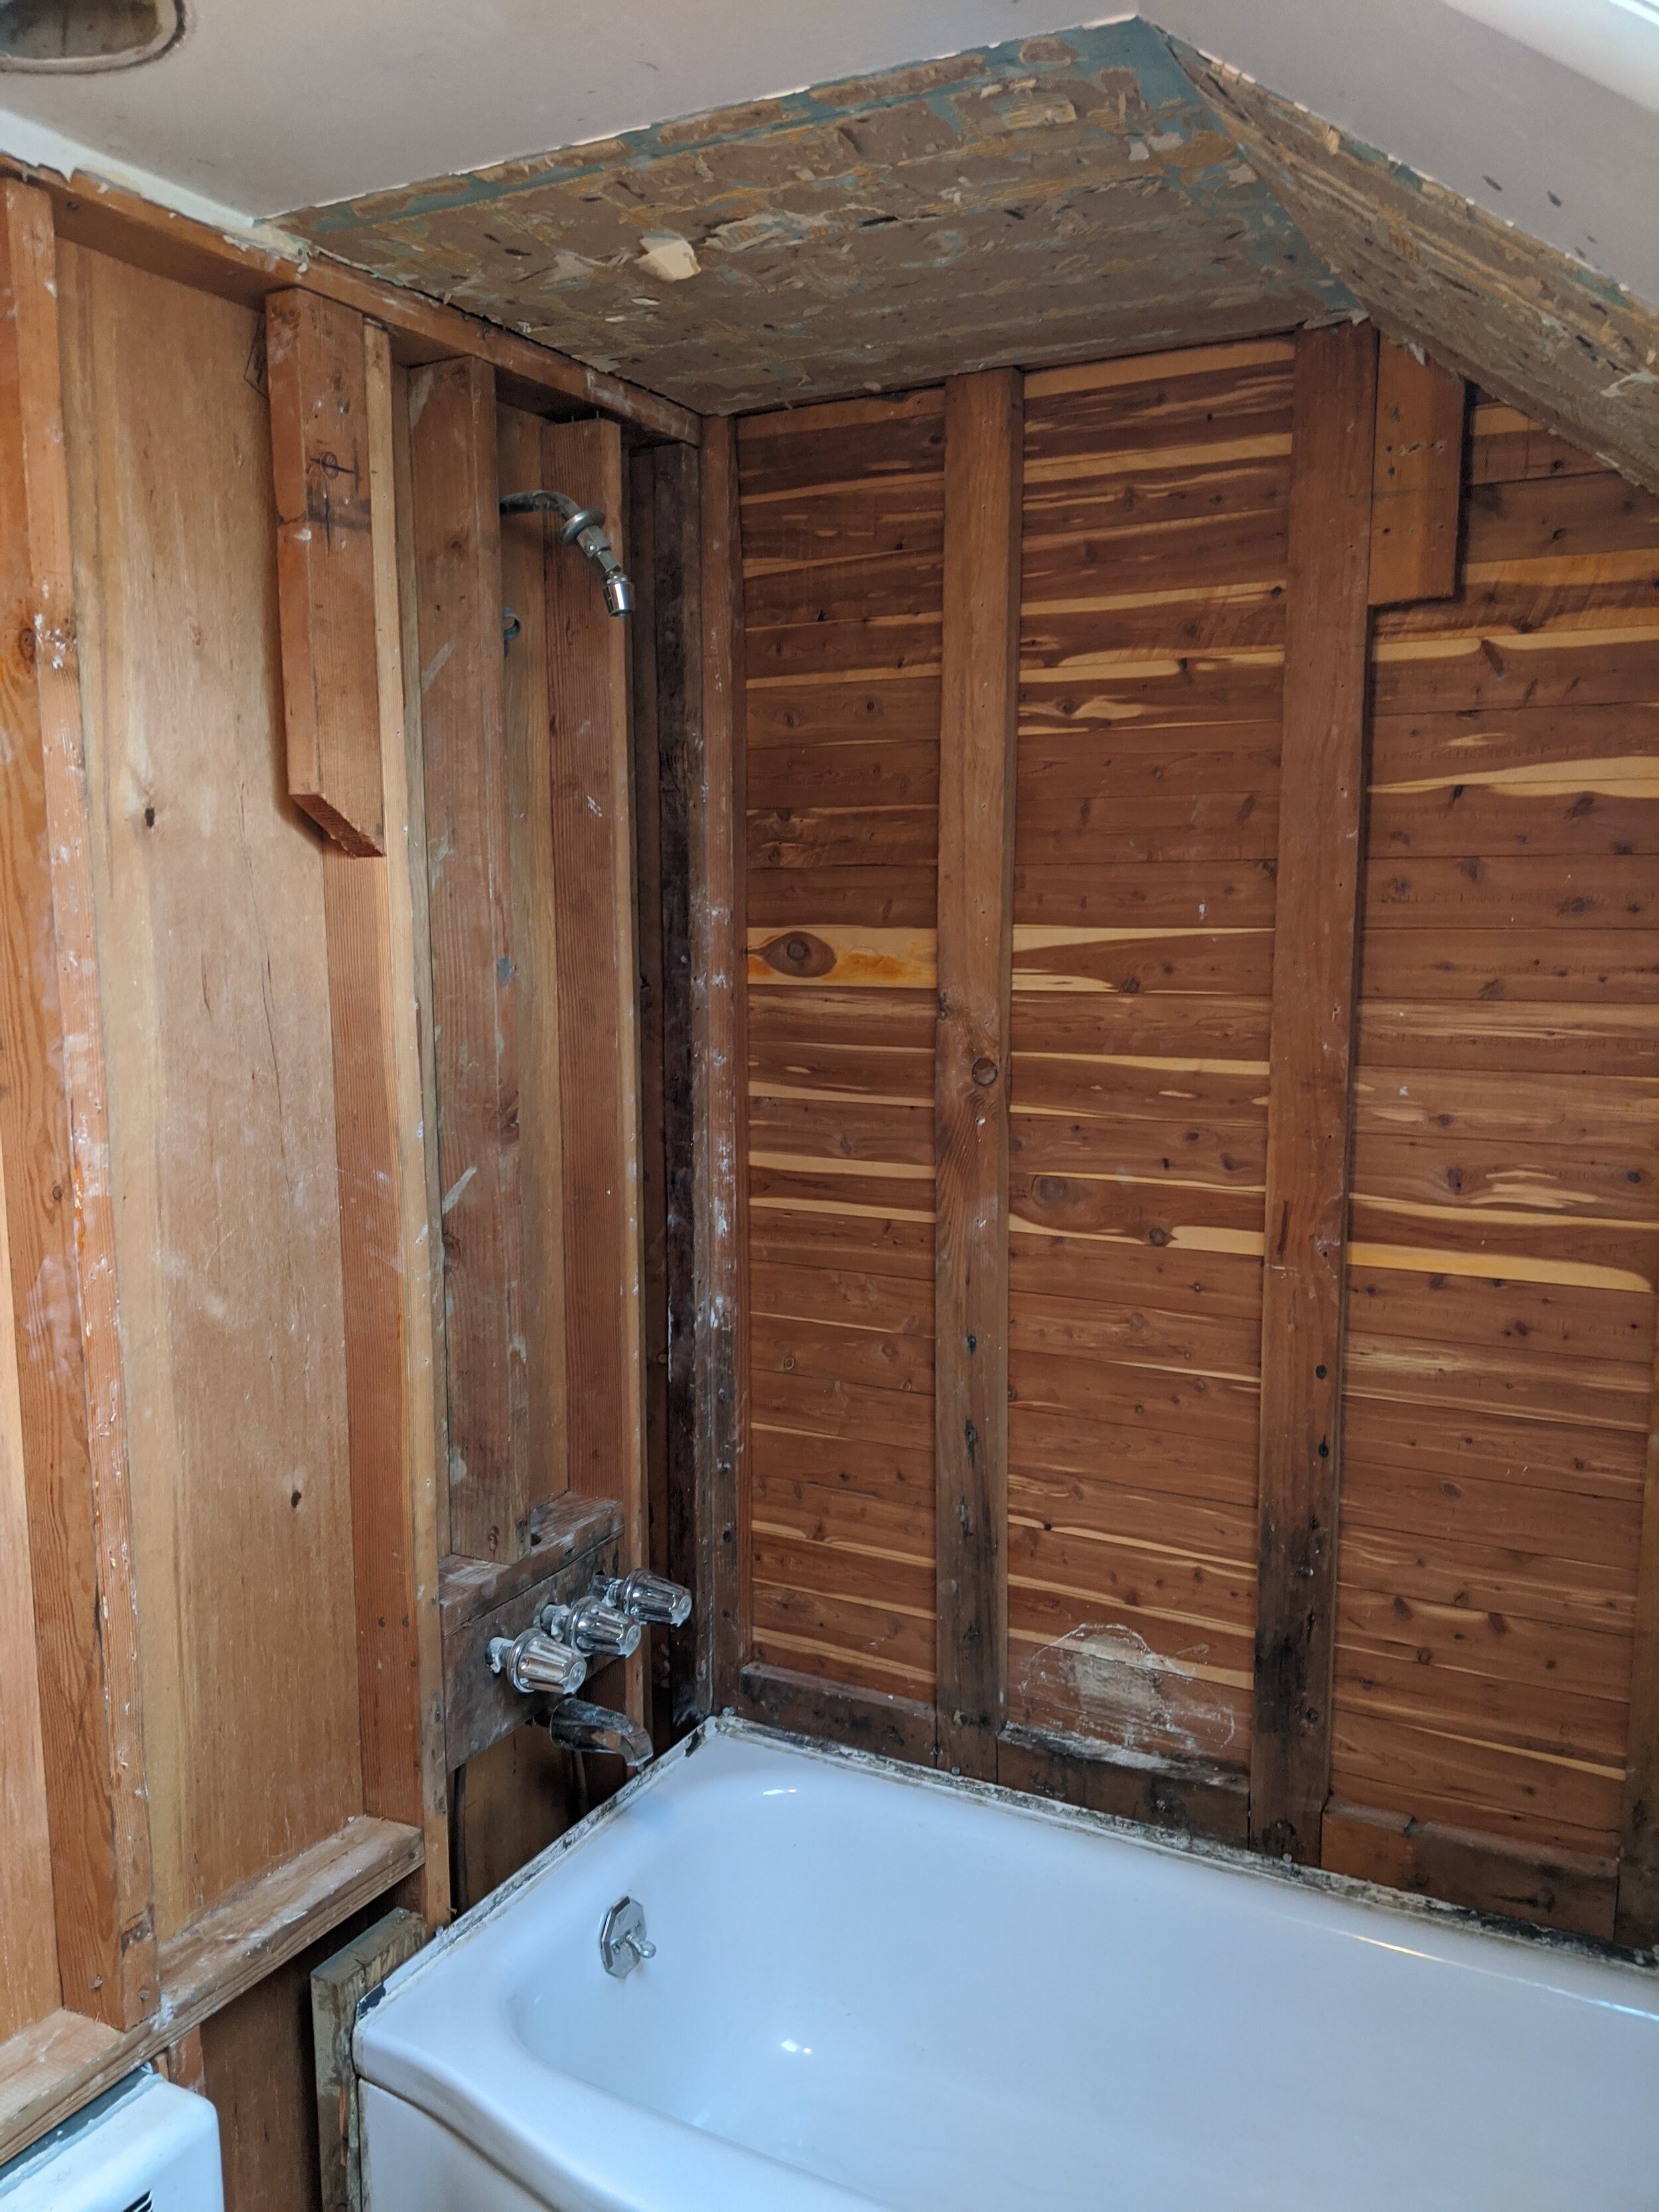
  • Don’t go all Wreck-It Ralph and start smashing everything in sight. In our case (see below), we were able to save the tub, plus preserve a TON of the tiles for reuse. No need to destroy things that can be helpful to someone else. The tiles weren’t bad, just the adhesive was.

  • Carry out and dispose as you go. Don’t pack yourself in with three layers of drywall pieces you can’t crawl over. (I do not speak from experience.)

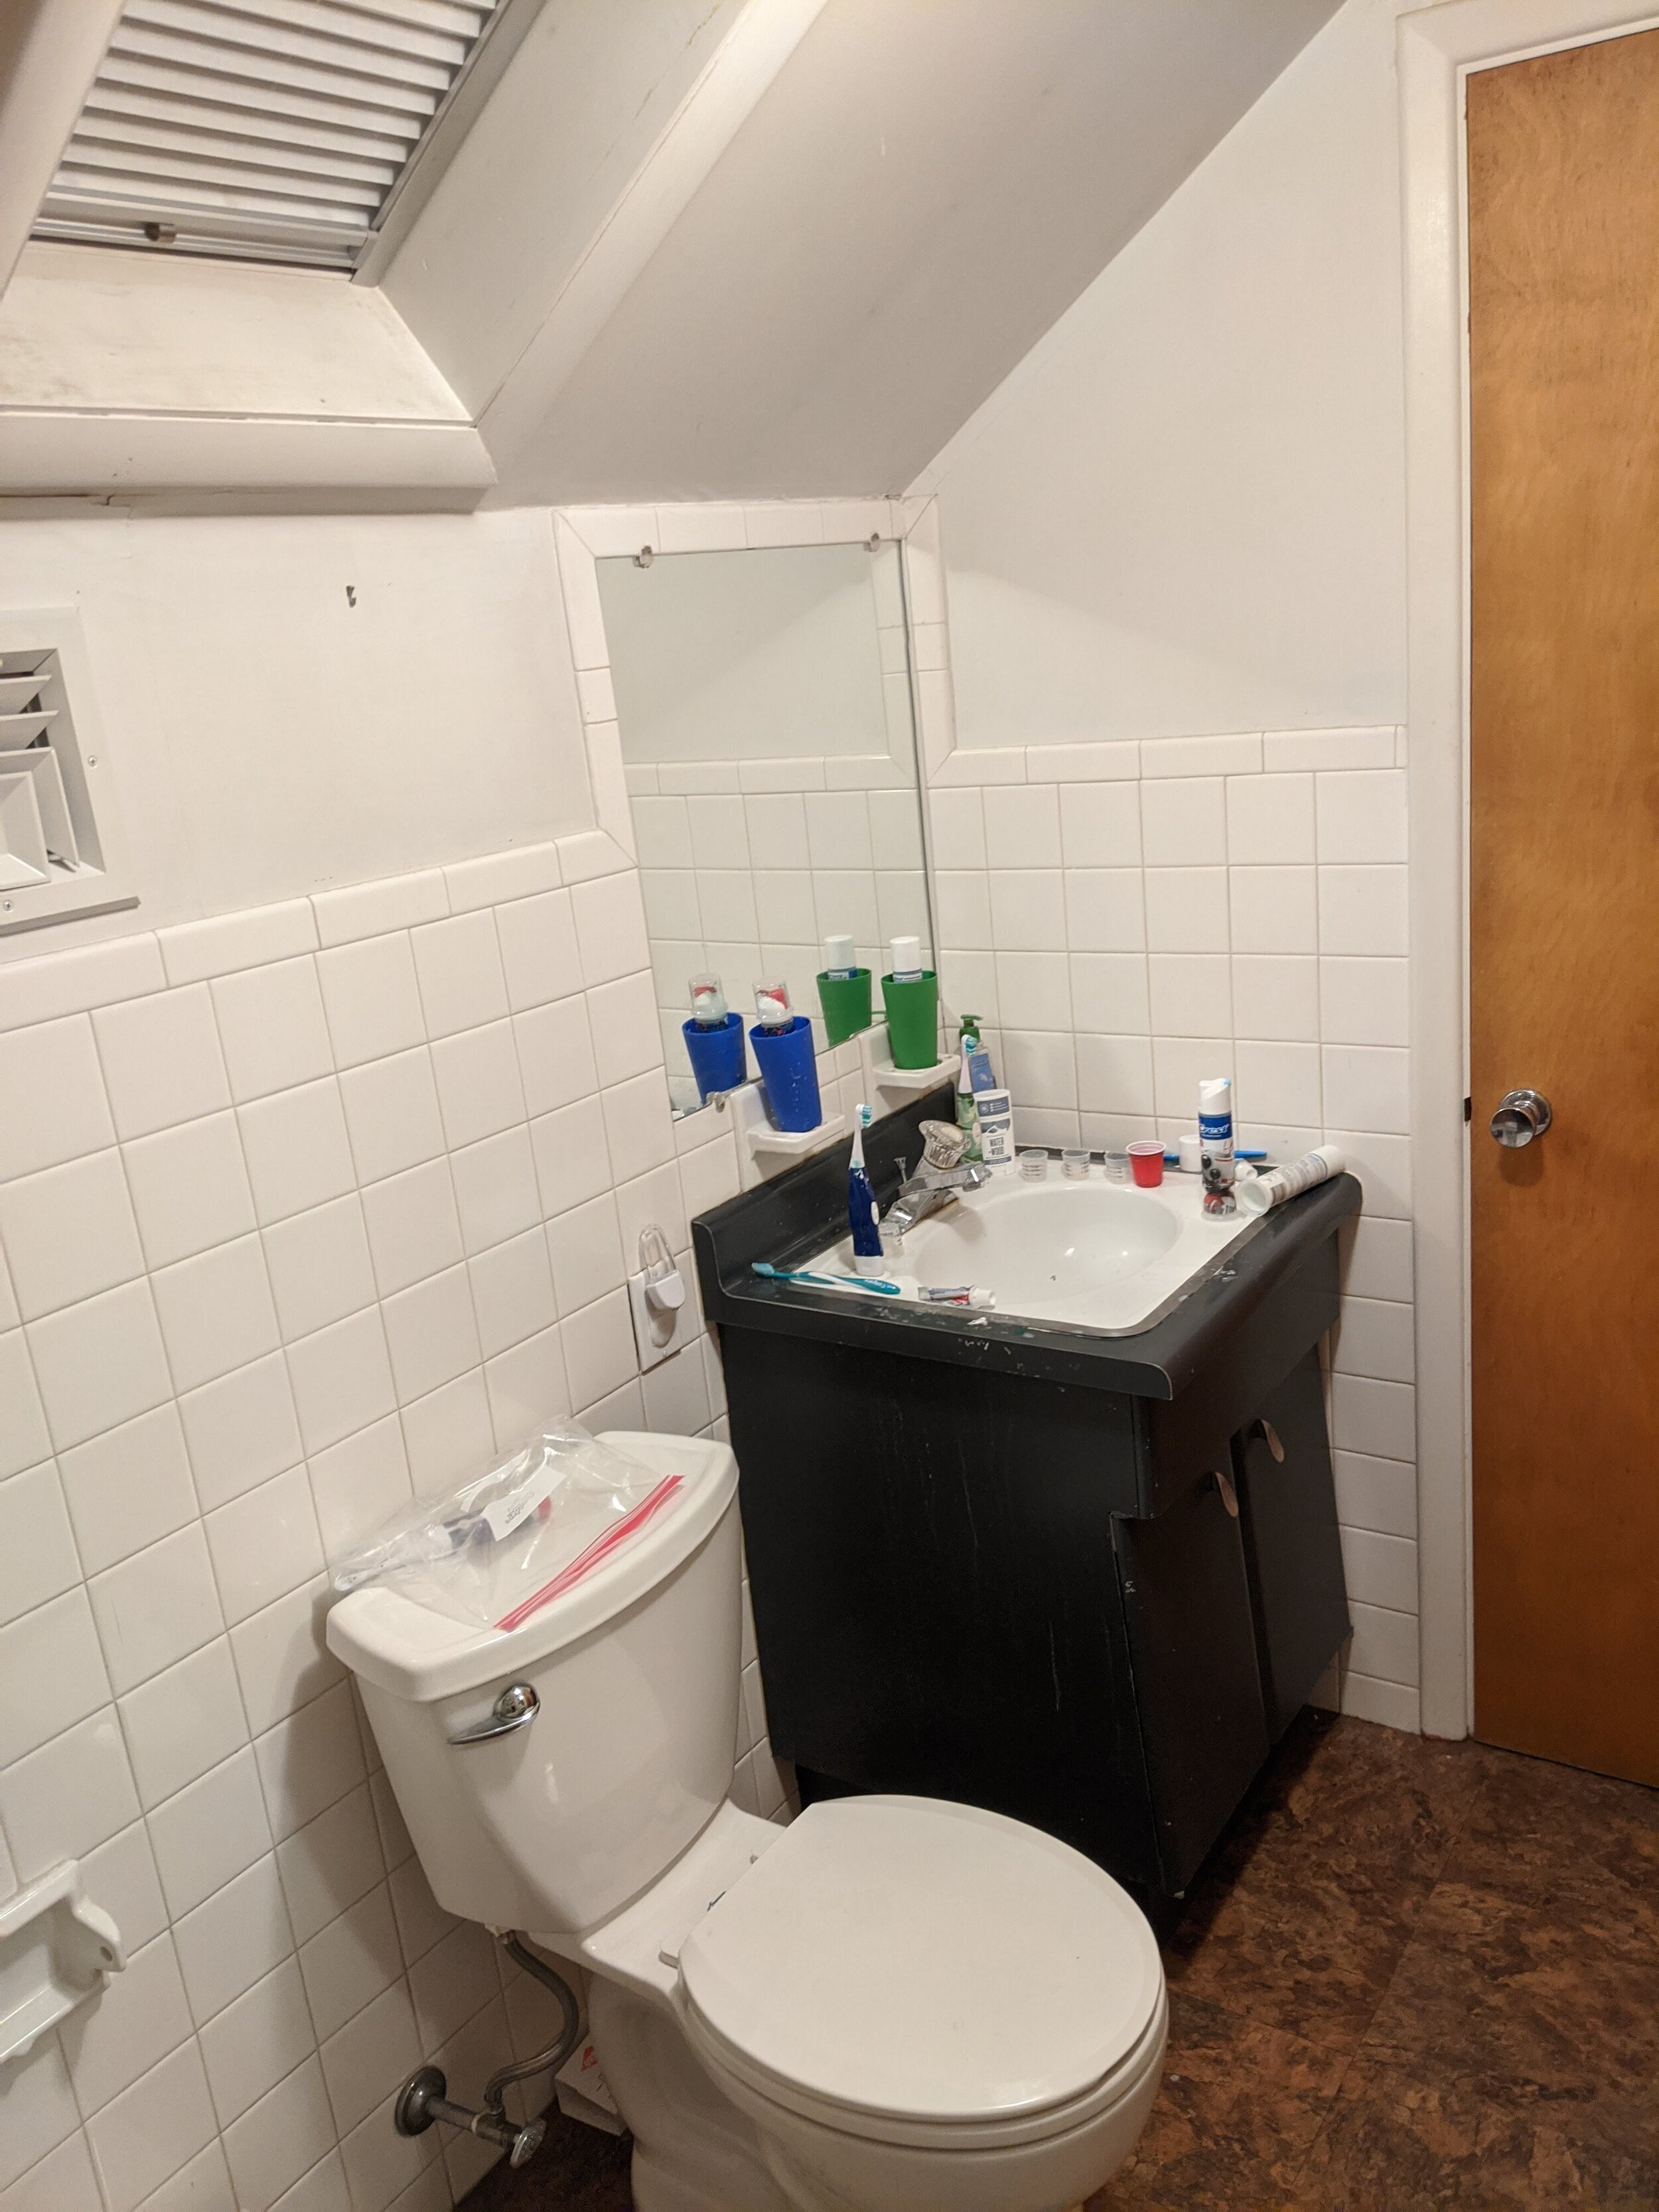
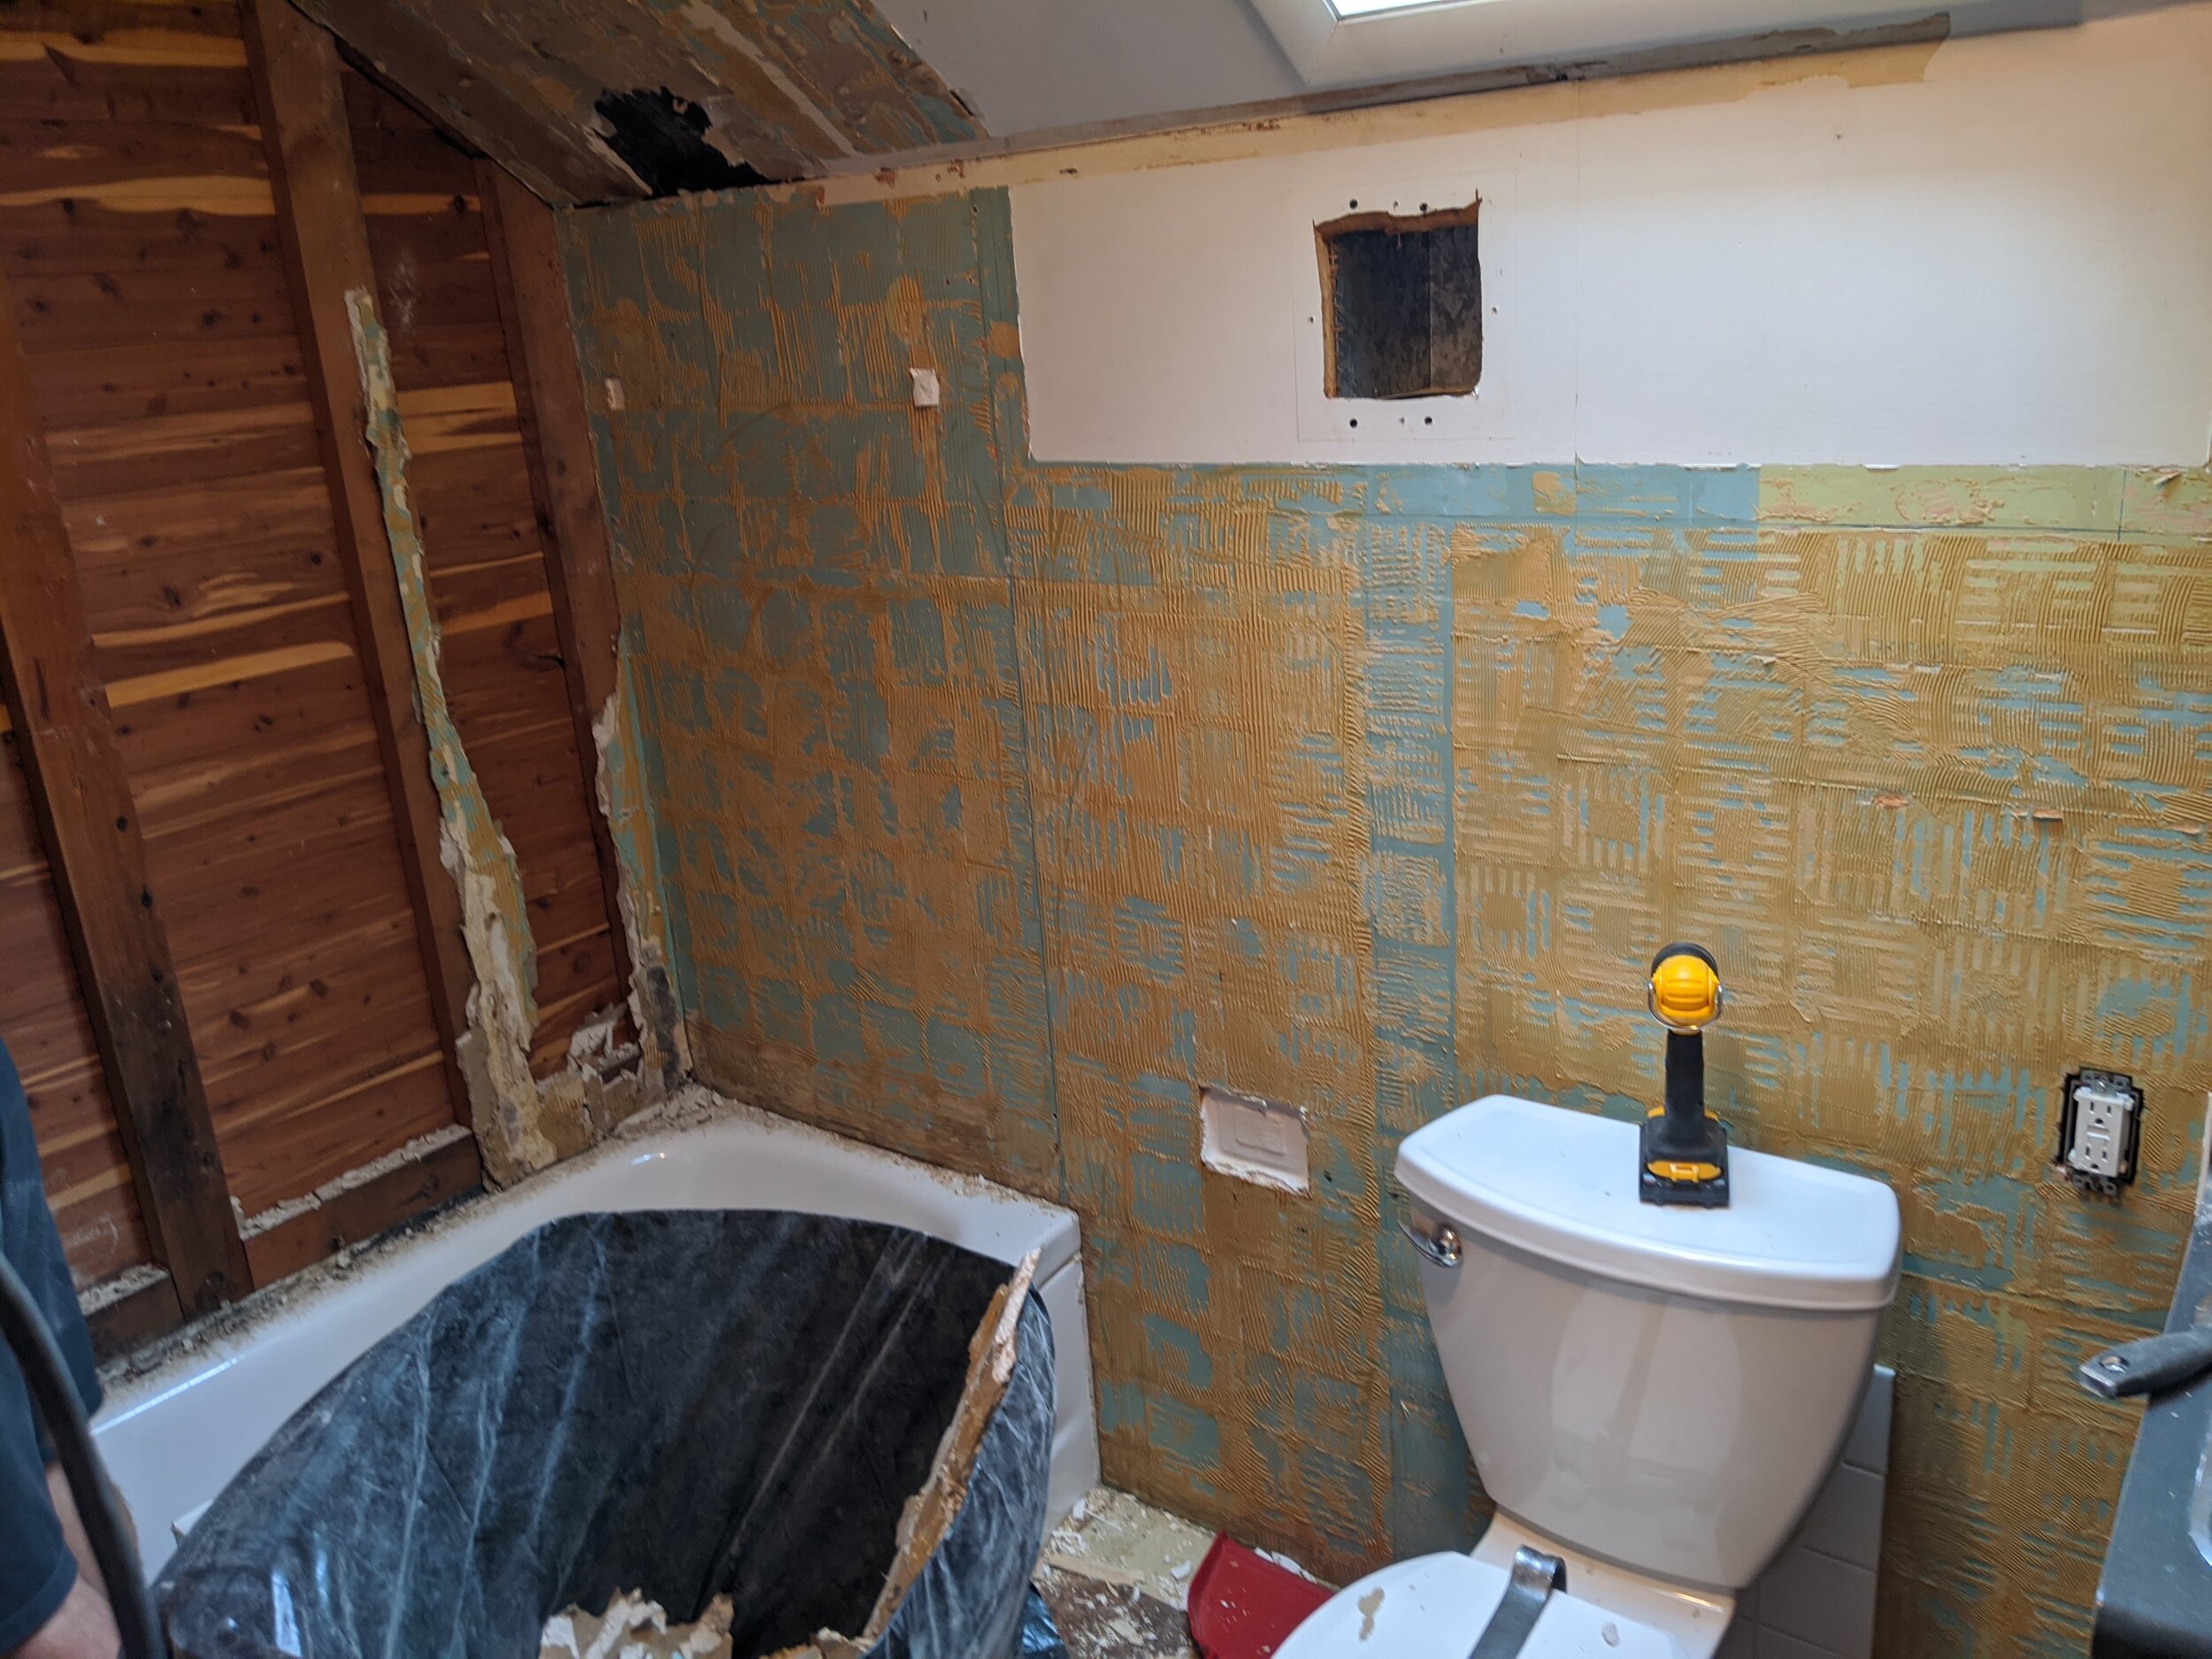
  • Hear me when I say this: Make the space unusable for the SHORTEST period possible. We kept the toilet and sink in place until the last possible moment, then put them back in ASAP. Don’t yank out the toilet as your first step. Huge regrets in the middle of the night!

STEP 1: TILE REMOVAL

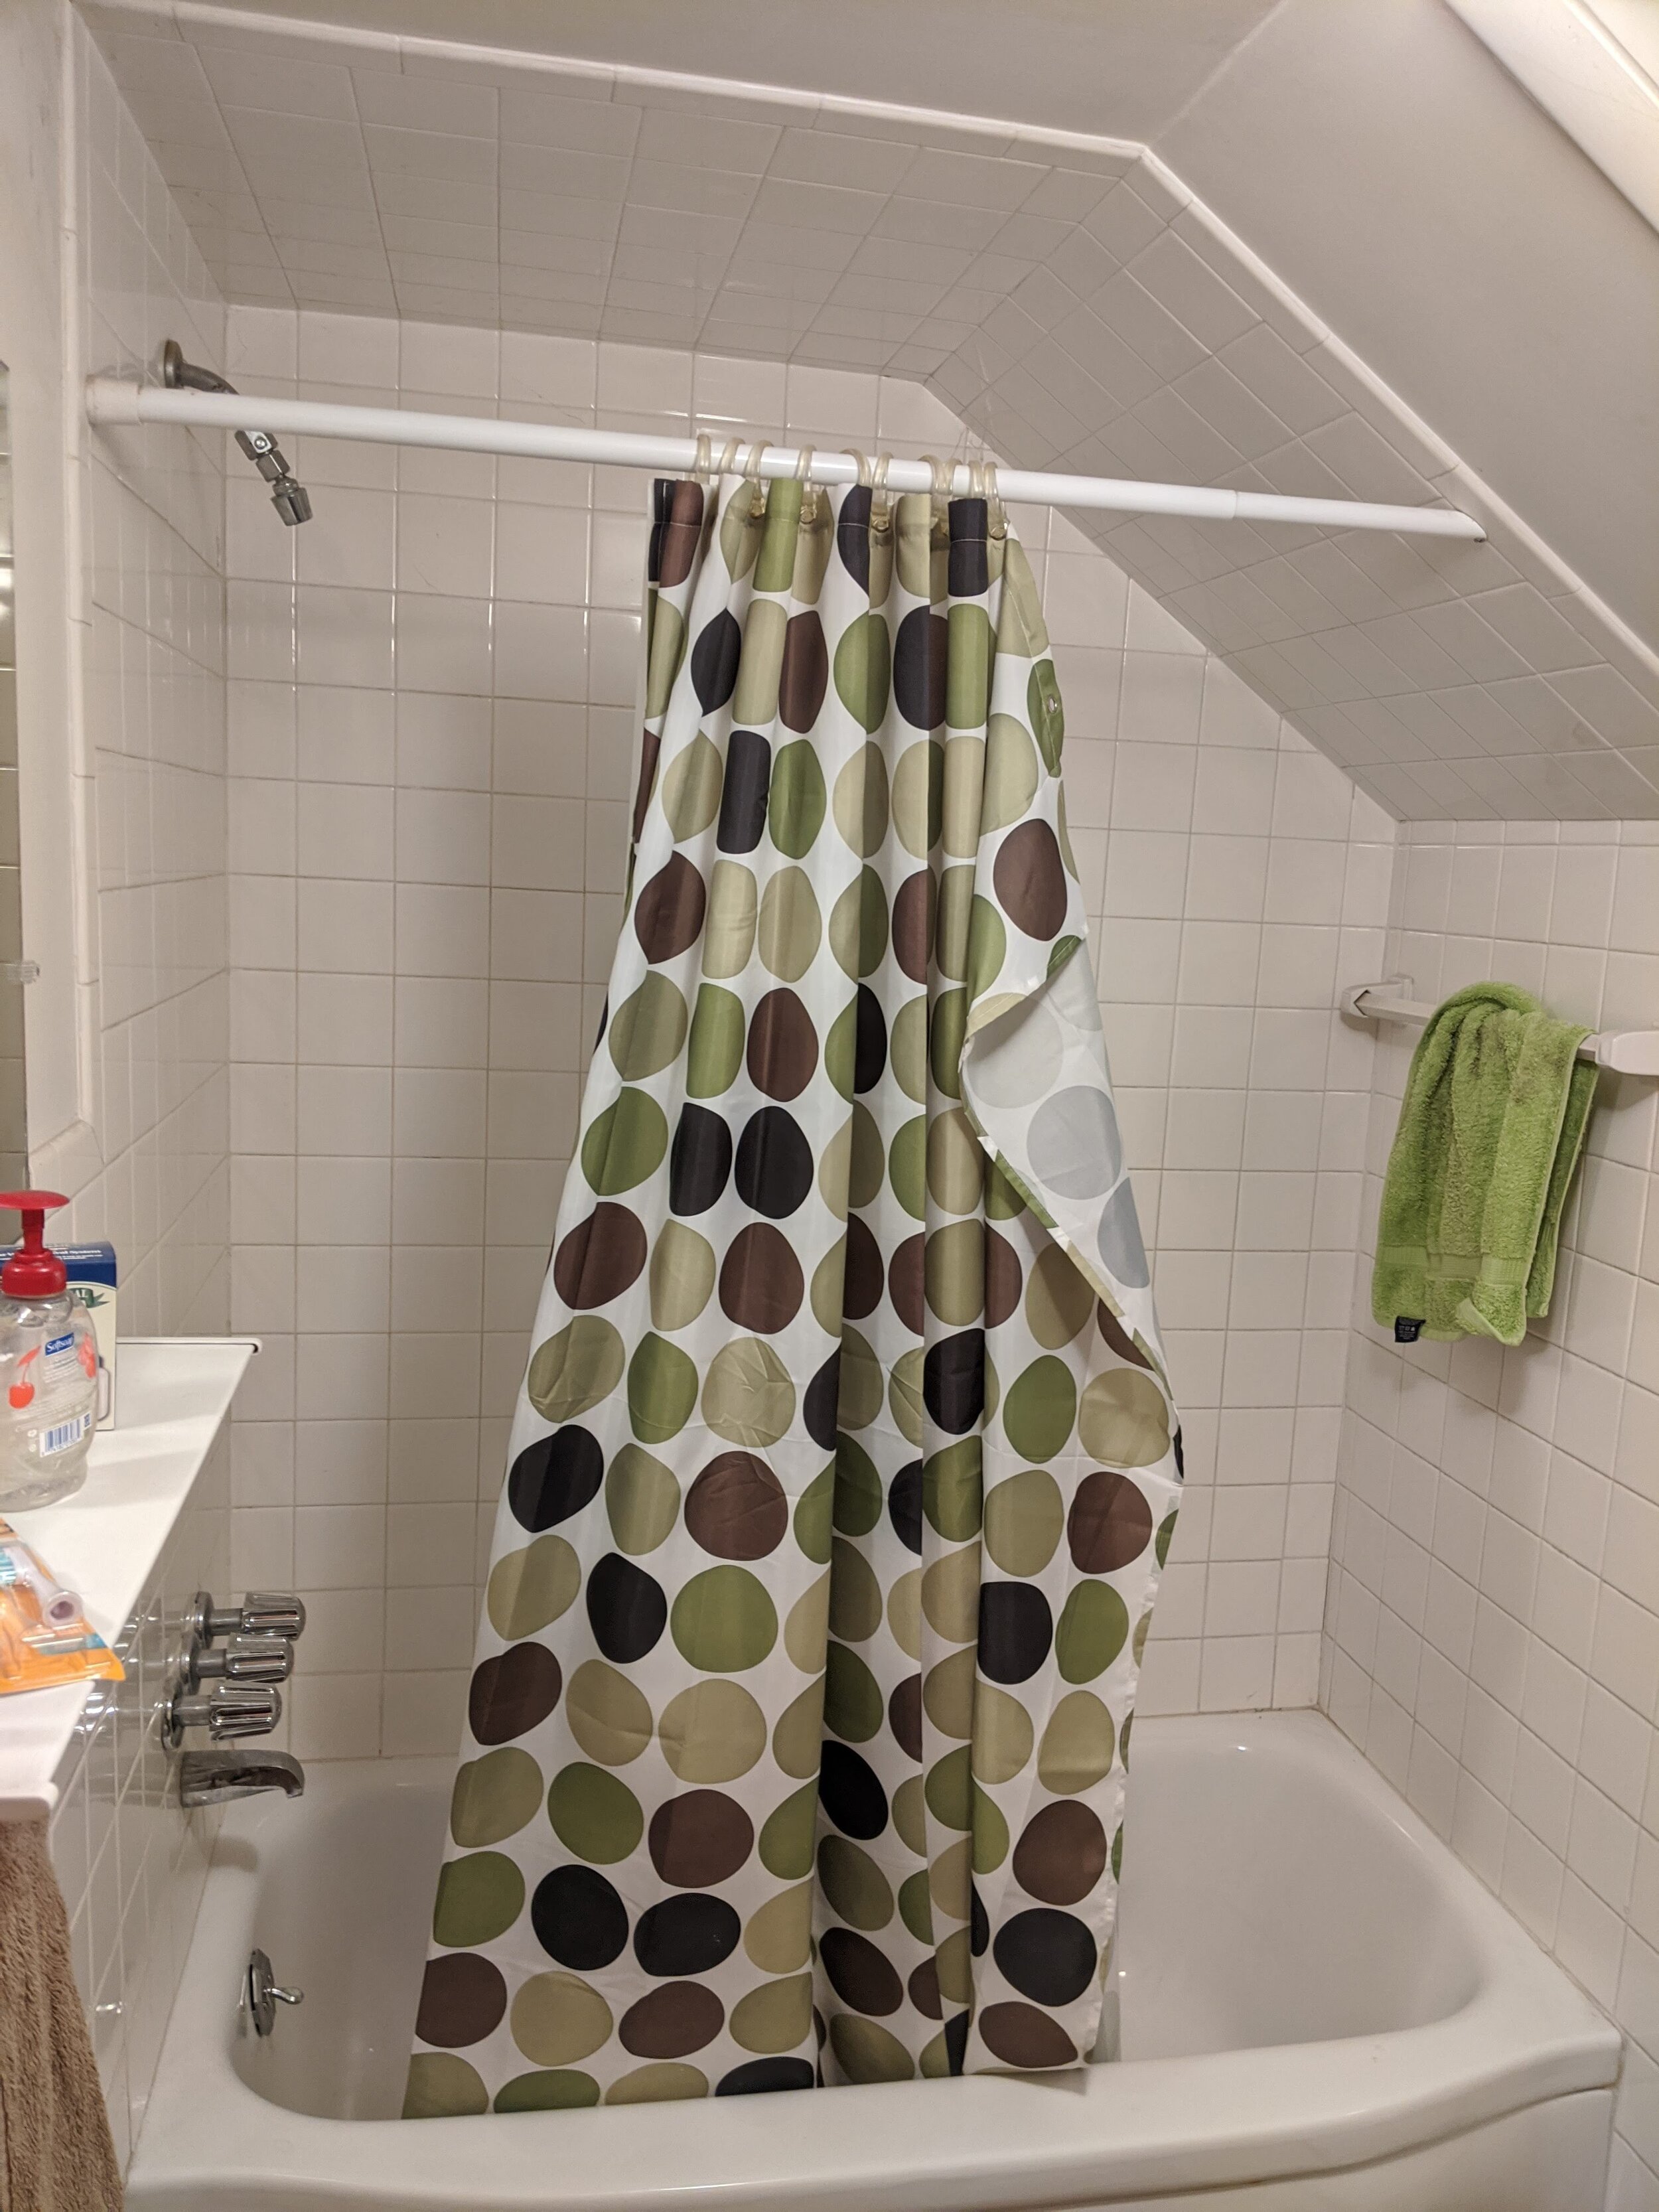
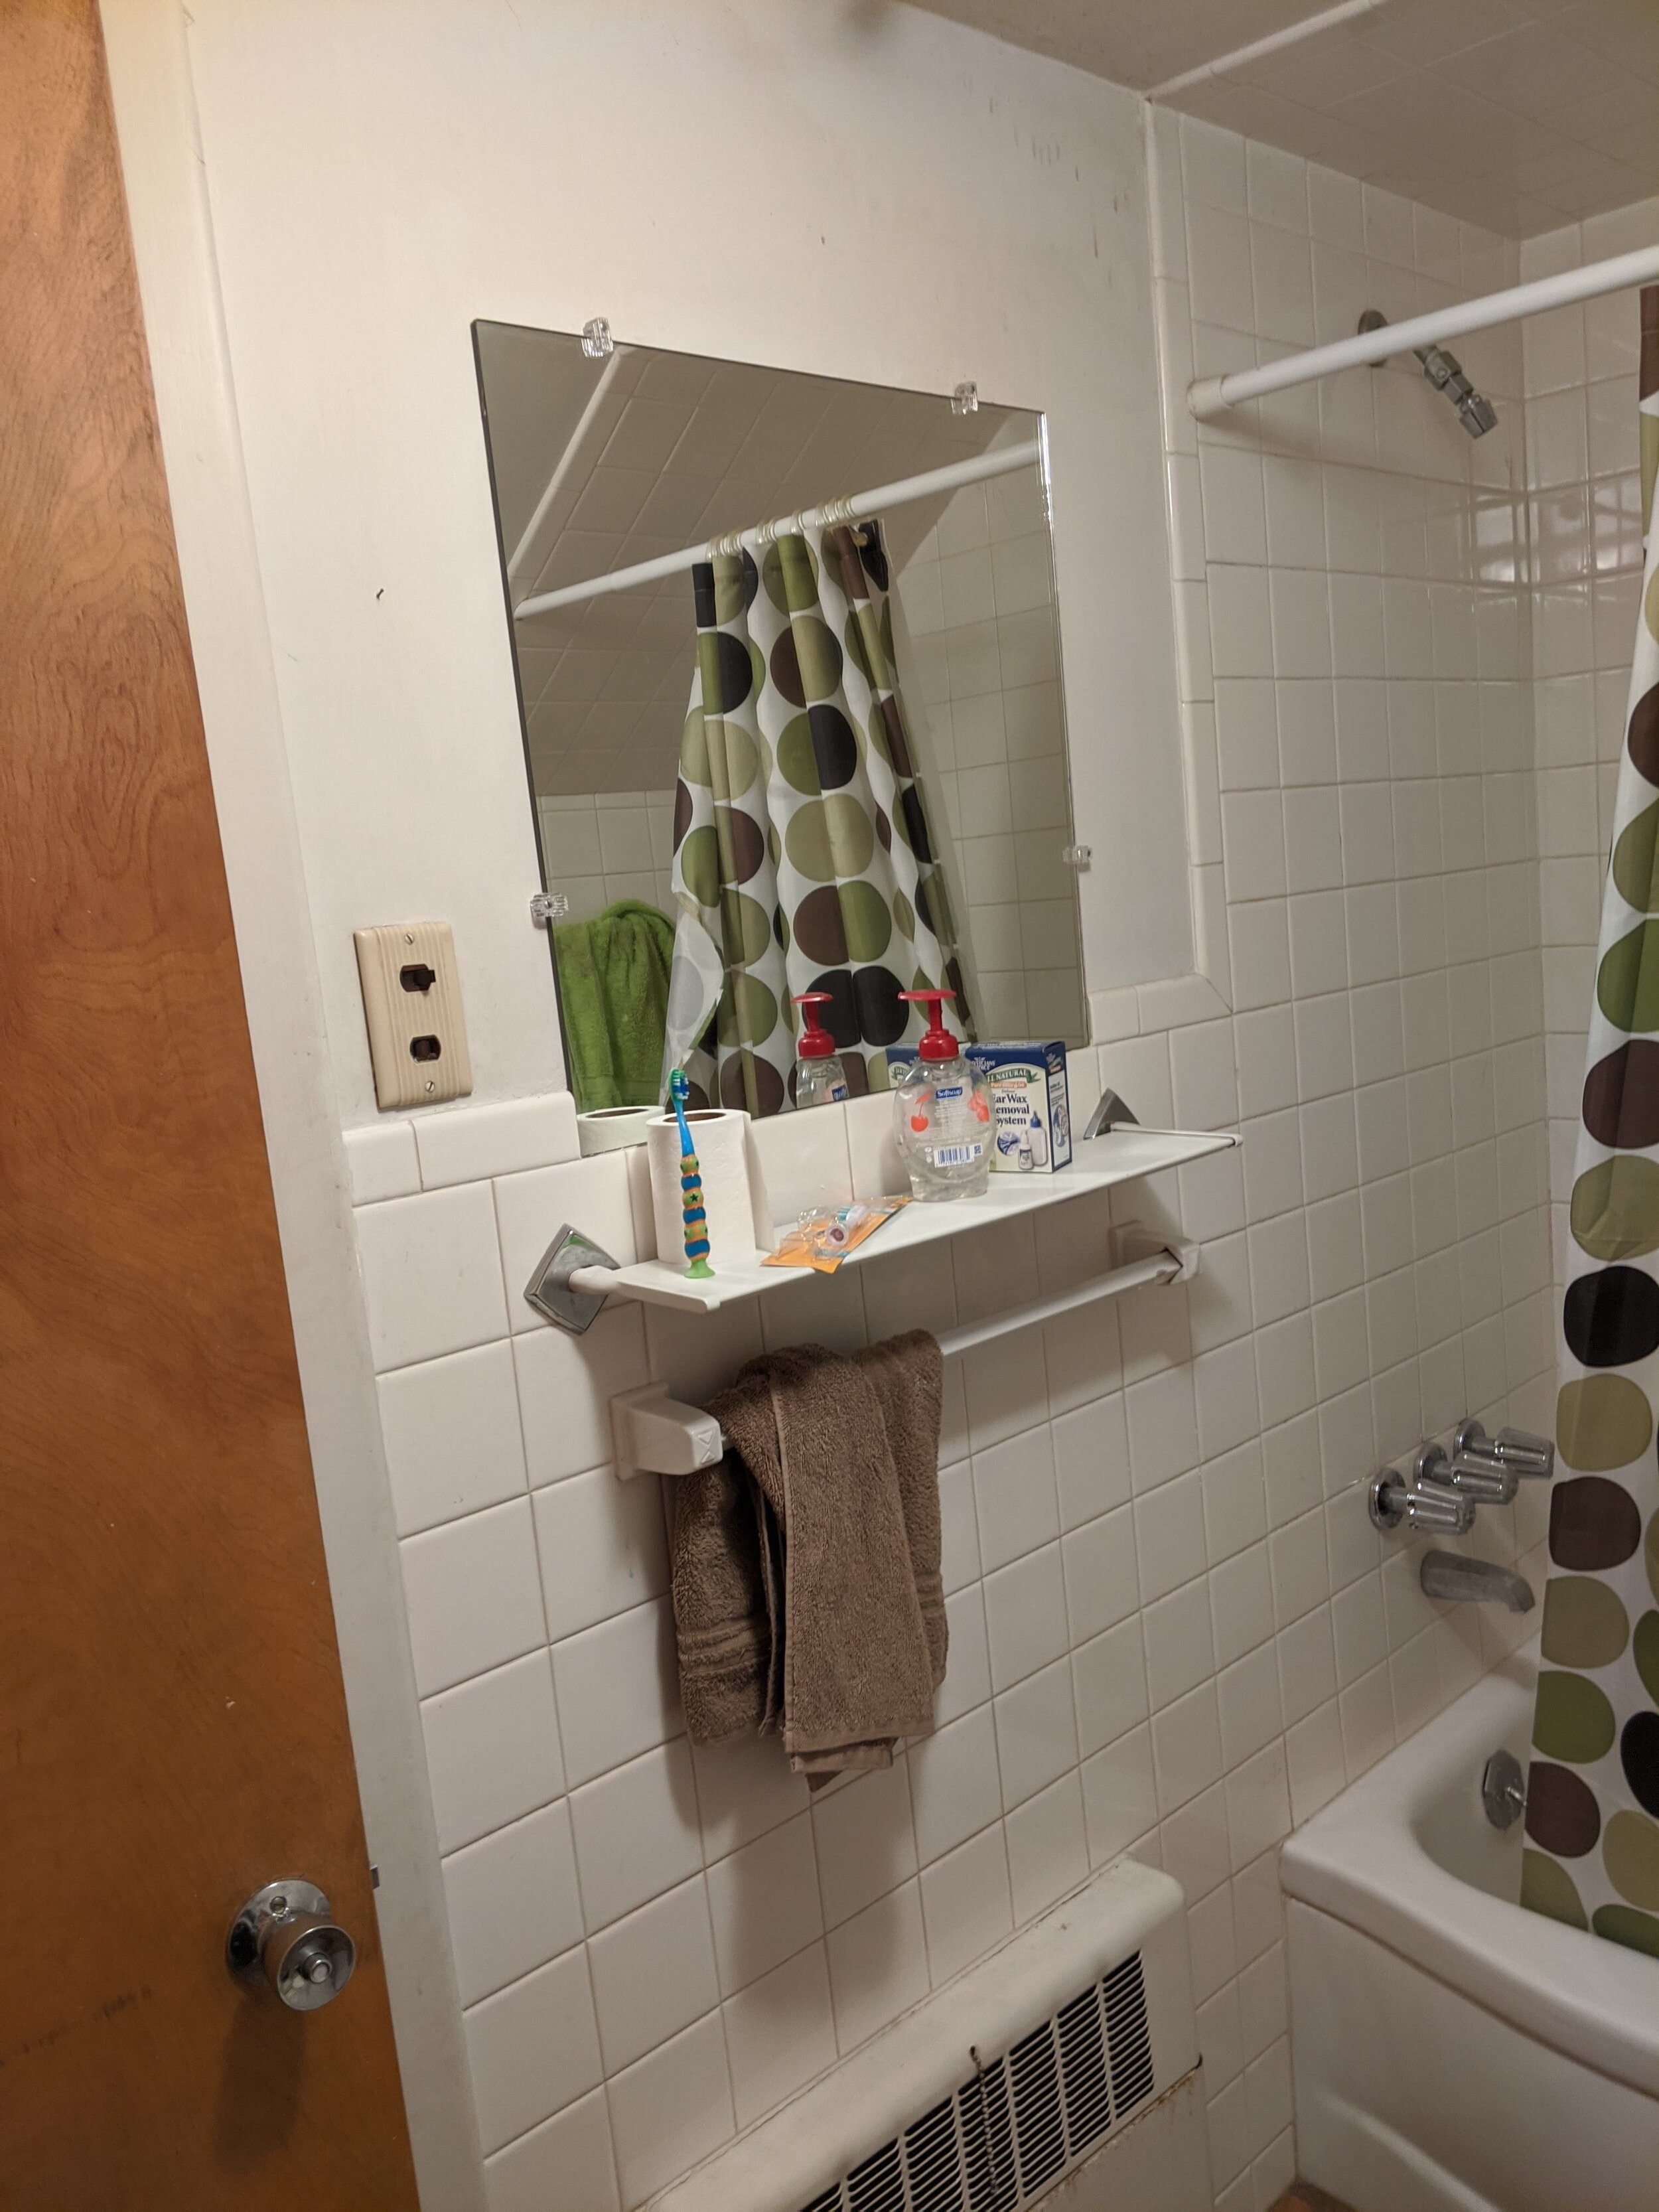
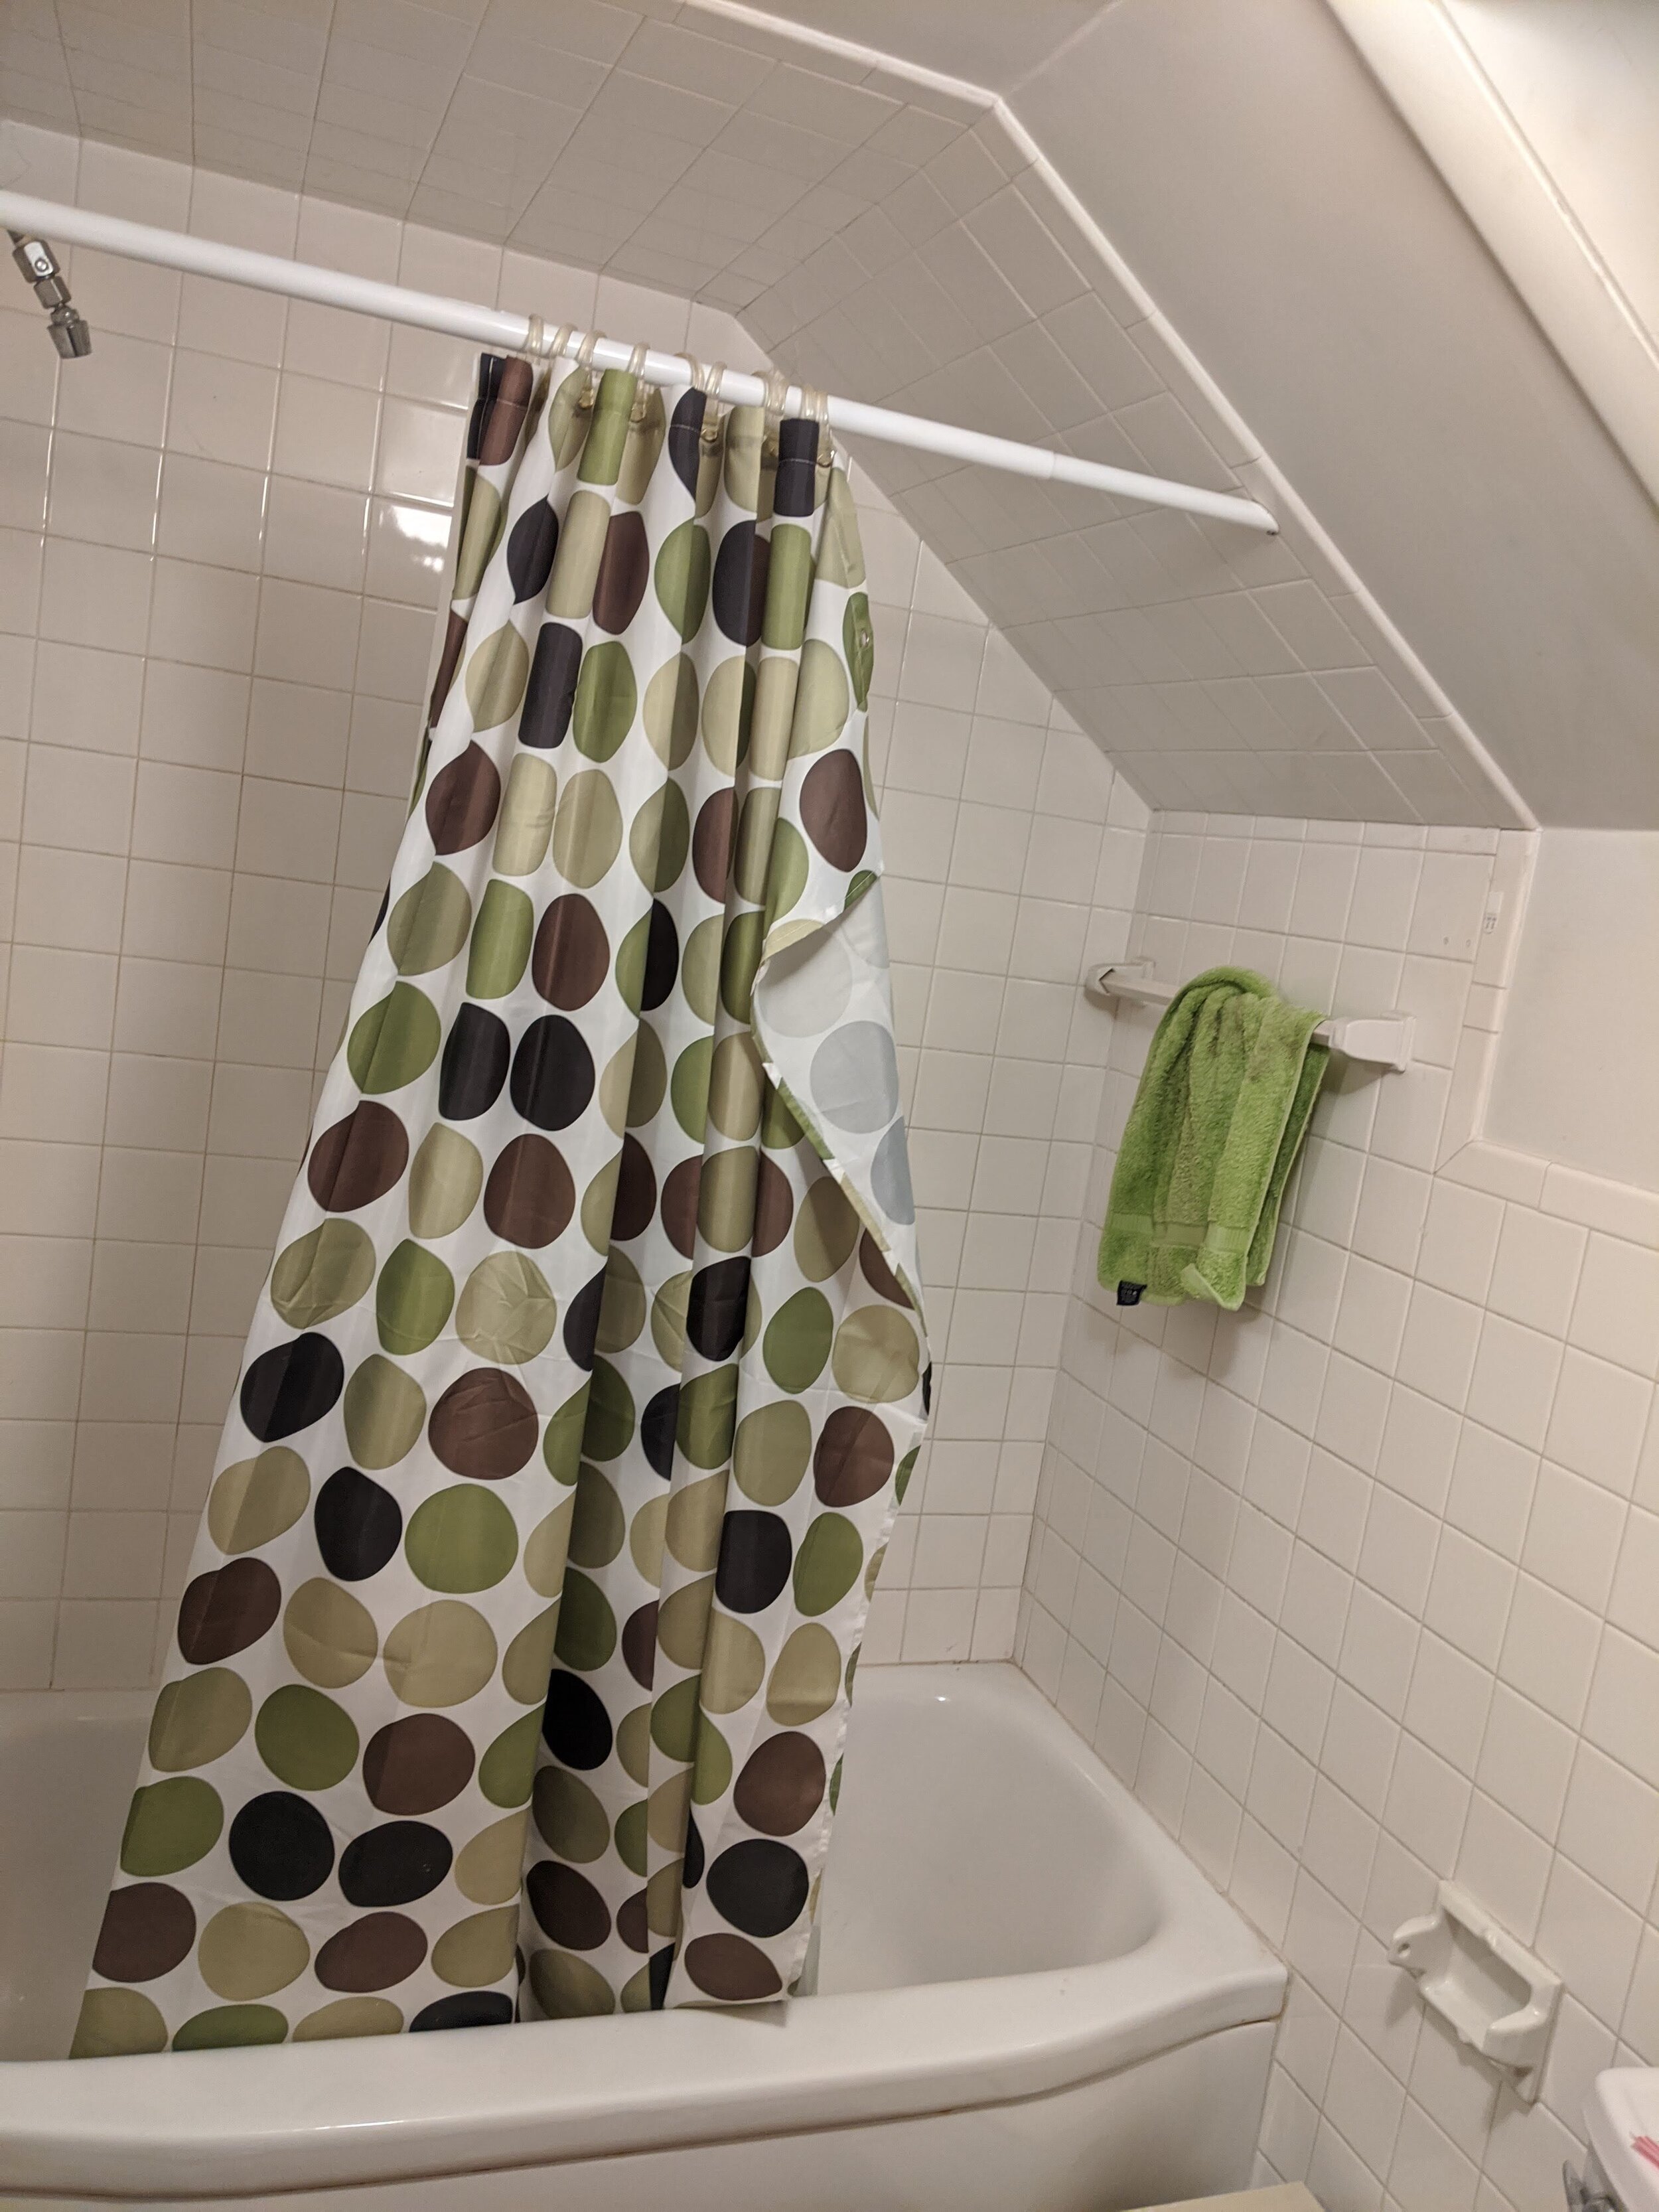
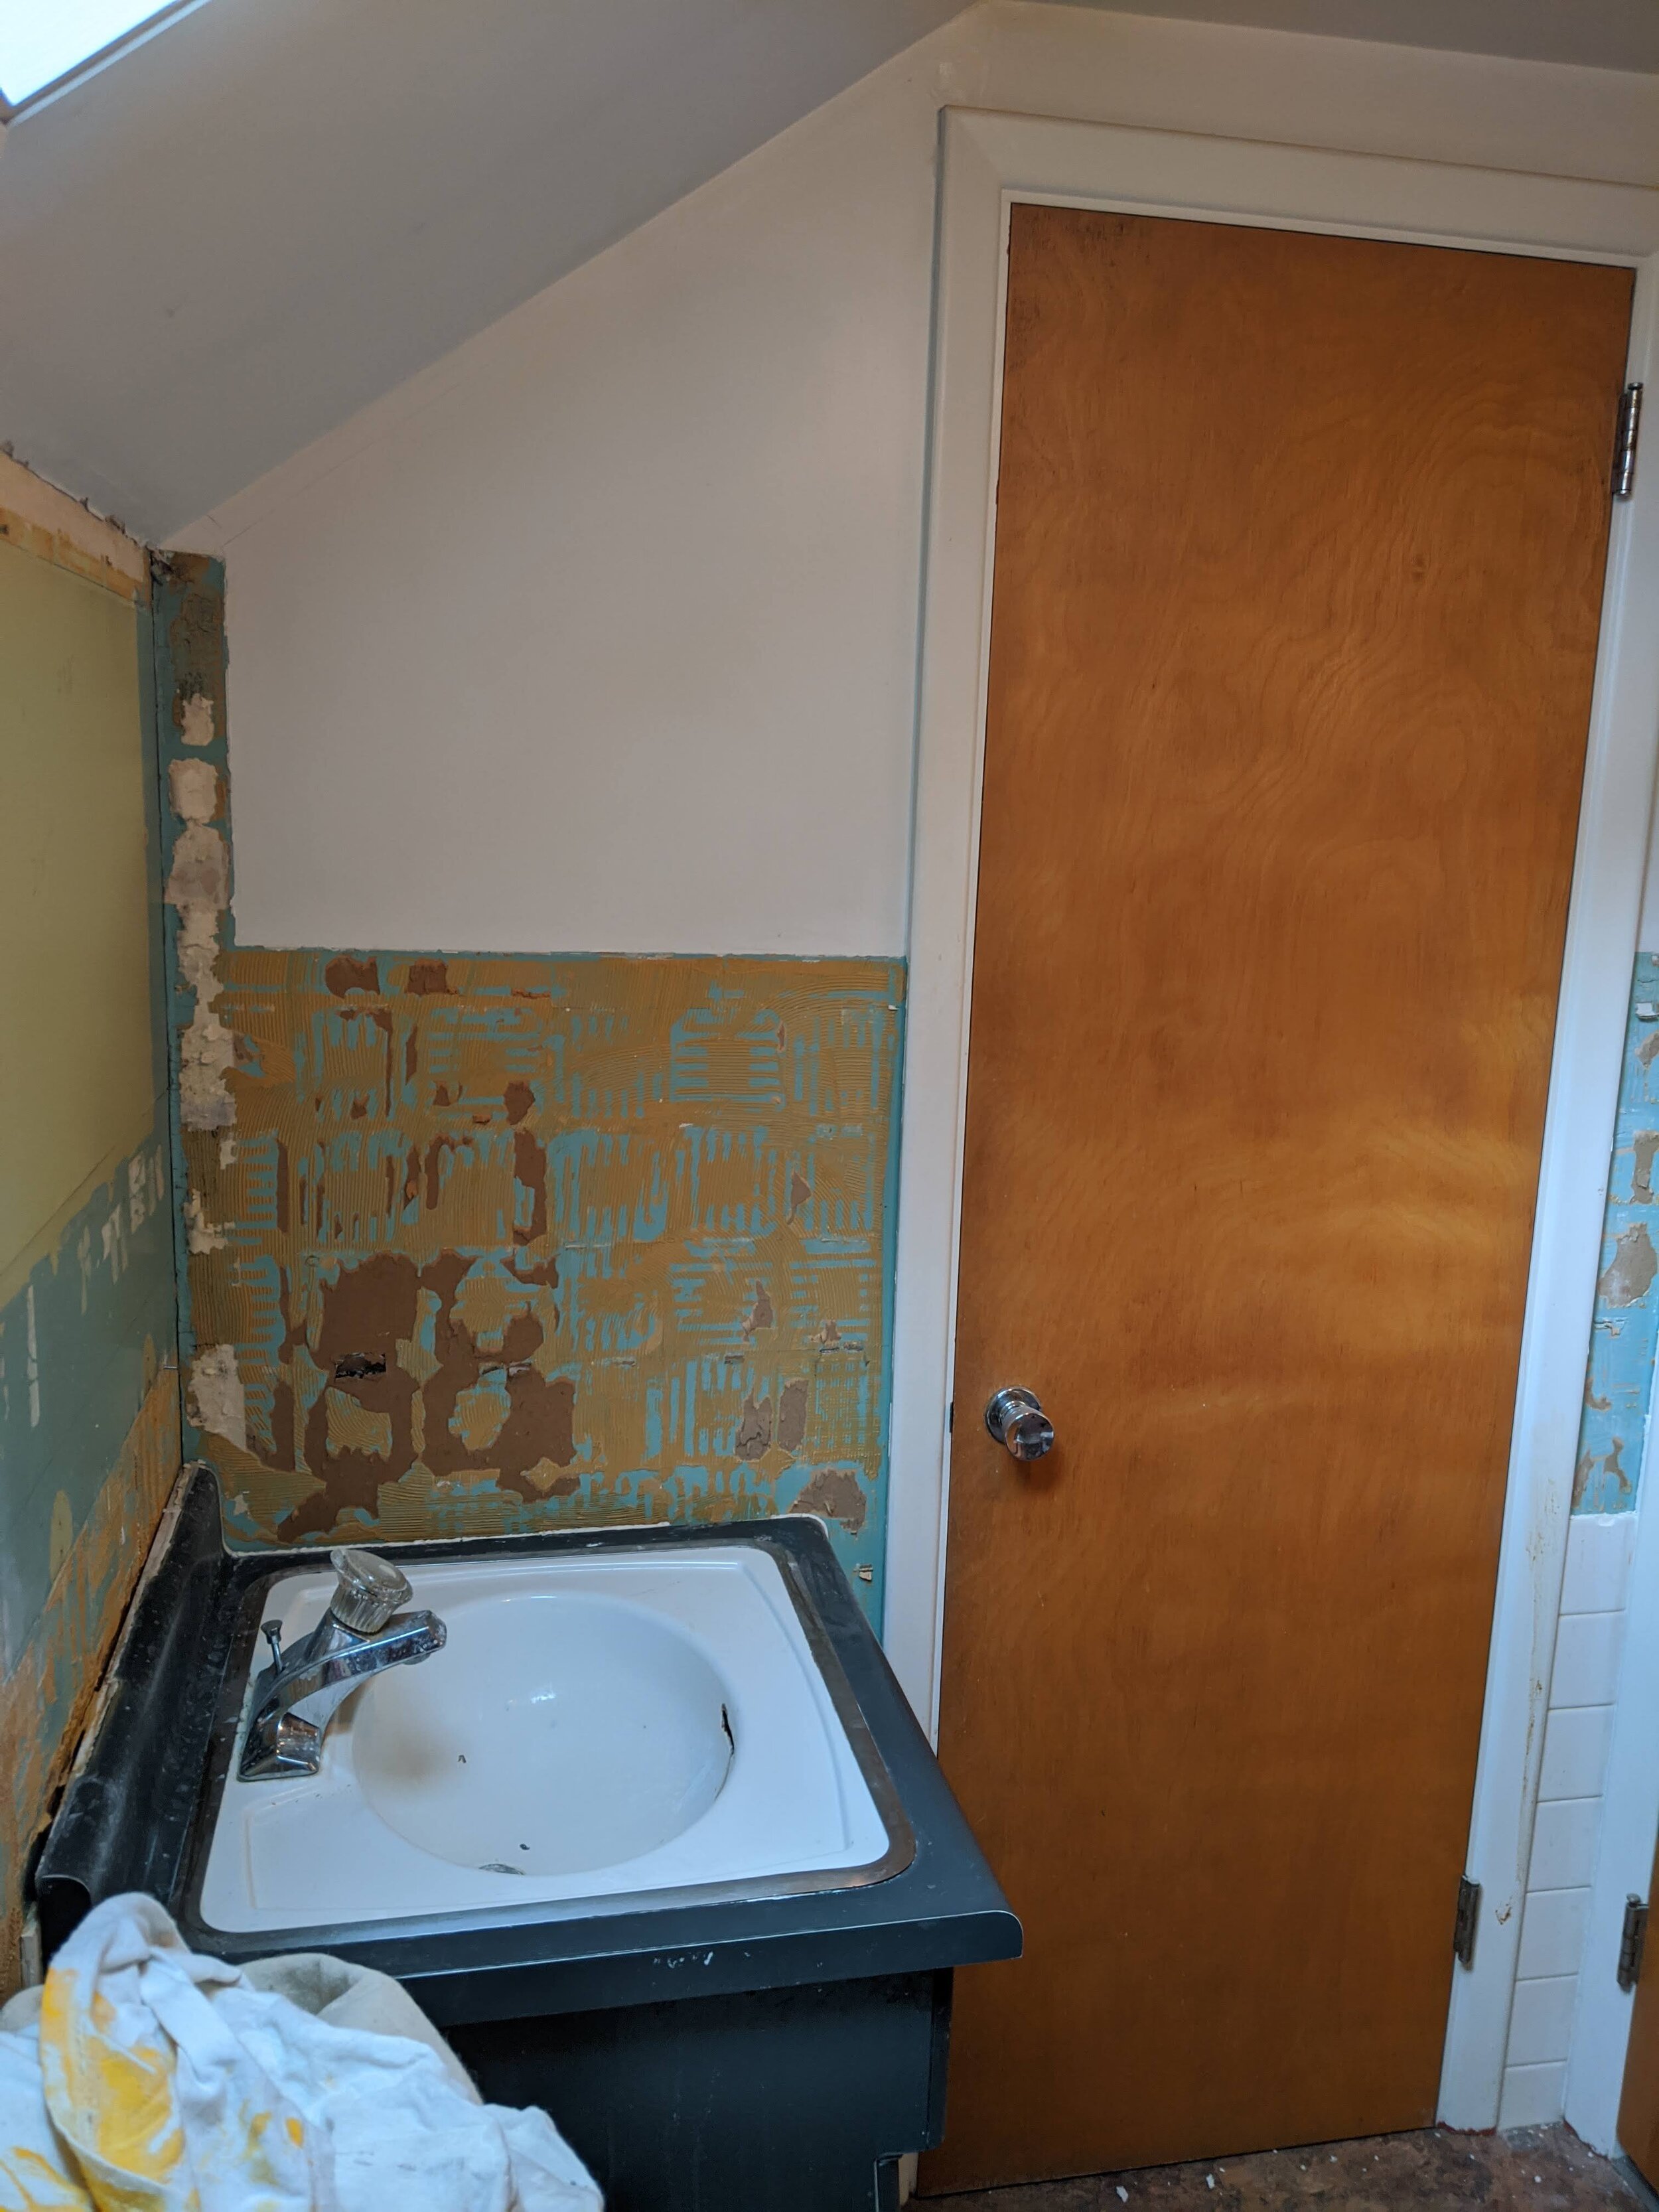
Step zero is taking out the obvious things: shower curtain, outlet covers, vent covers, soap dish.

Then, we started (and I do mean “we” because everyone helped, except the baby) with removing the tiles, saving as many as we could for the reuse. The tiles were fine, but we knew behind them was spongy and soft — not good for withstanding the beating of shower water. So we hadn’t been using it.

So, the tile removal was generally fun — tucking a crowbar against the corner and tapping it with a hammer. Most of them popped off whole.

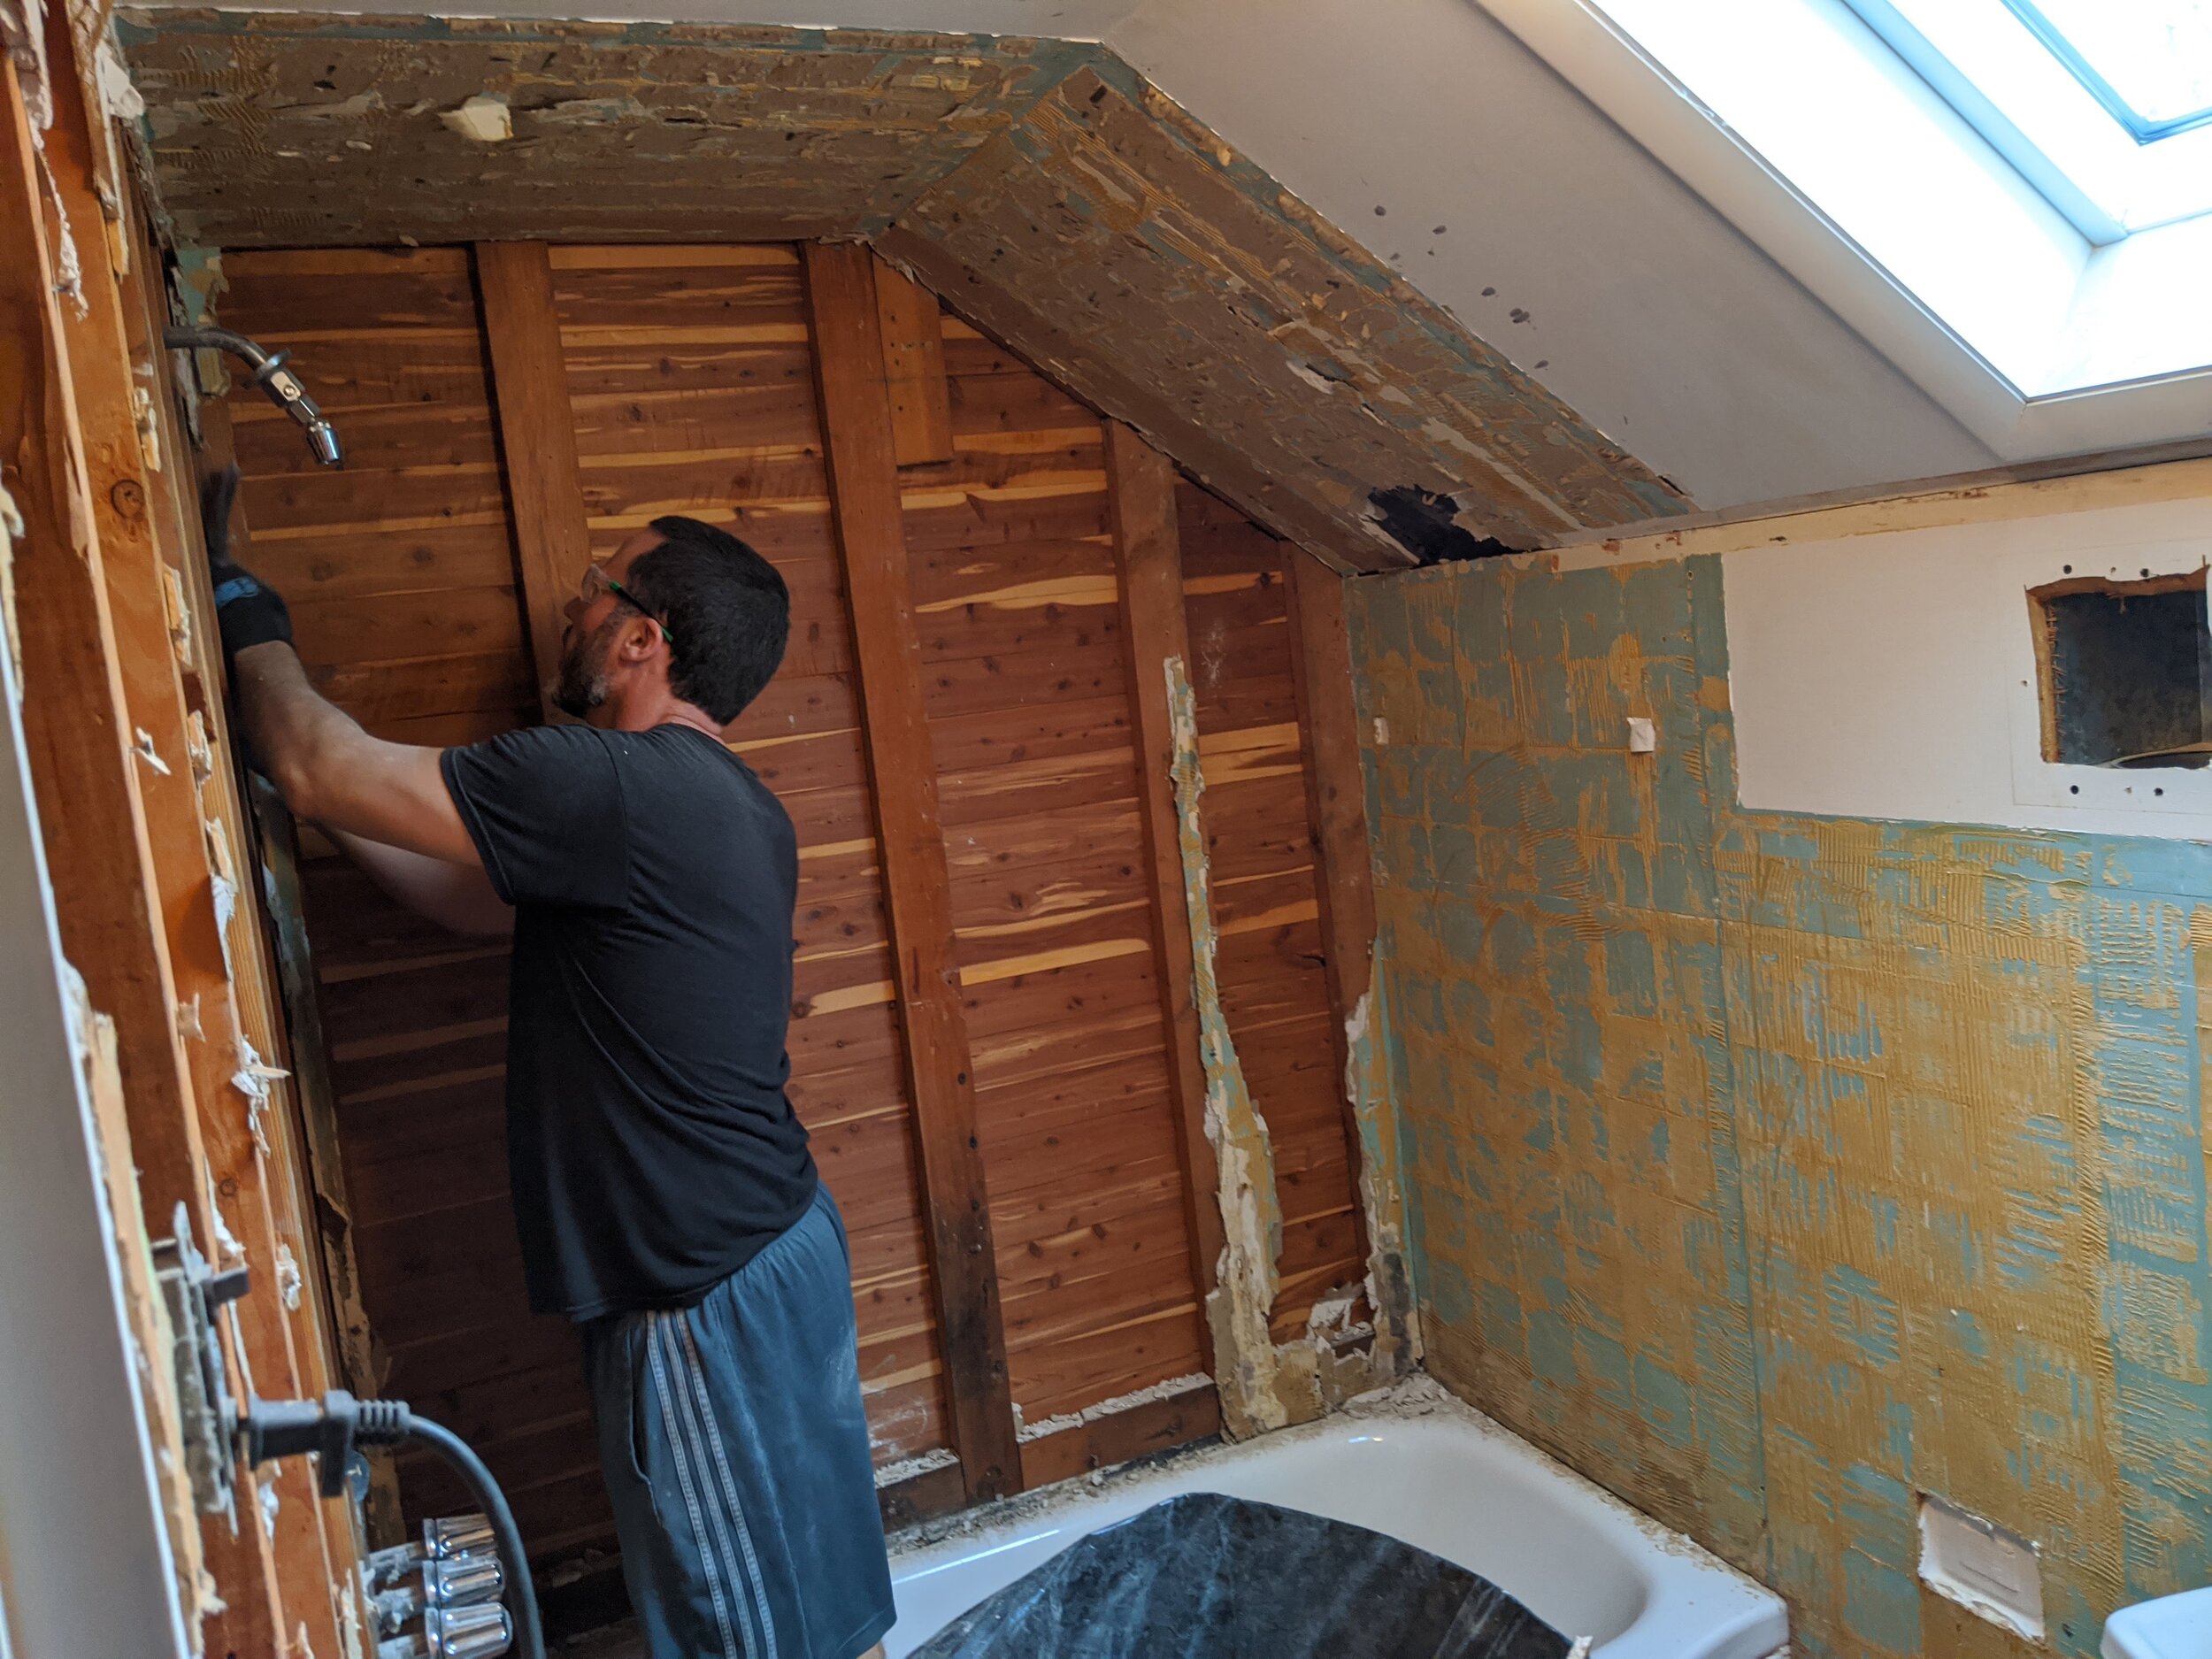
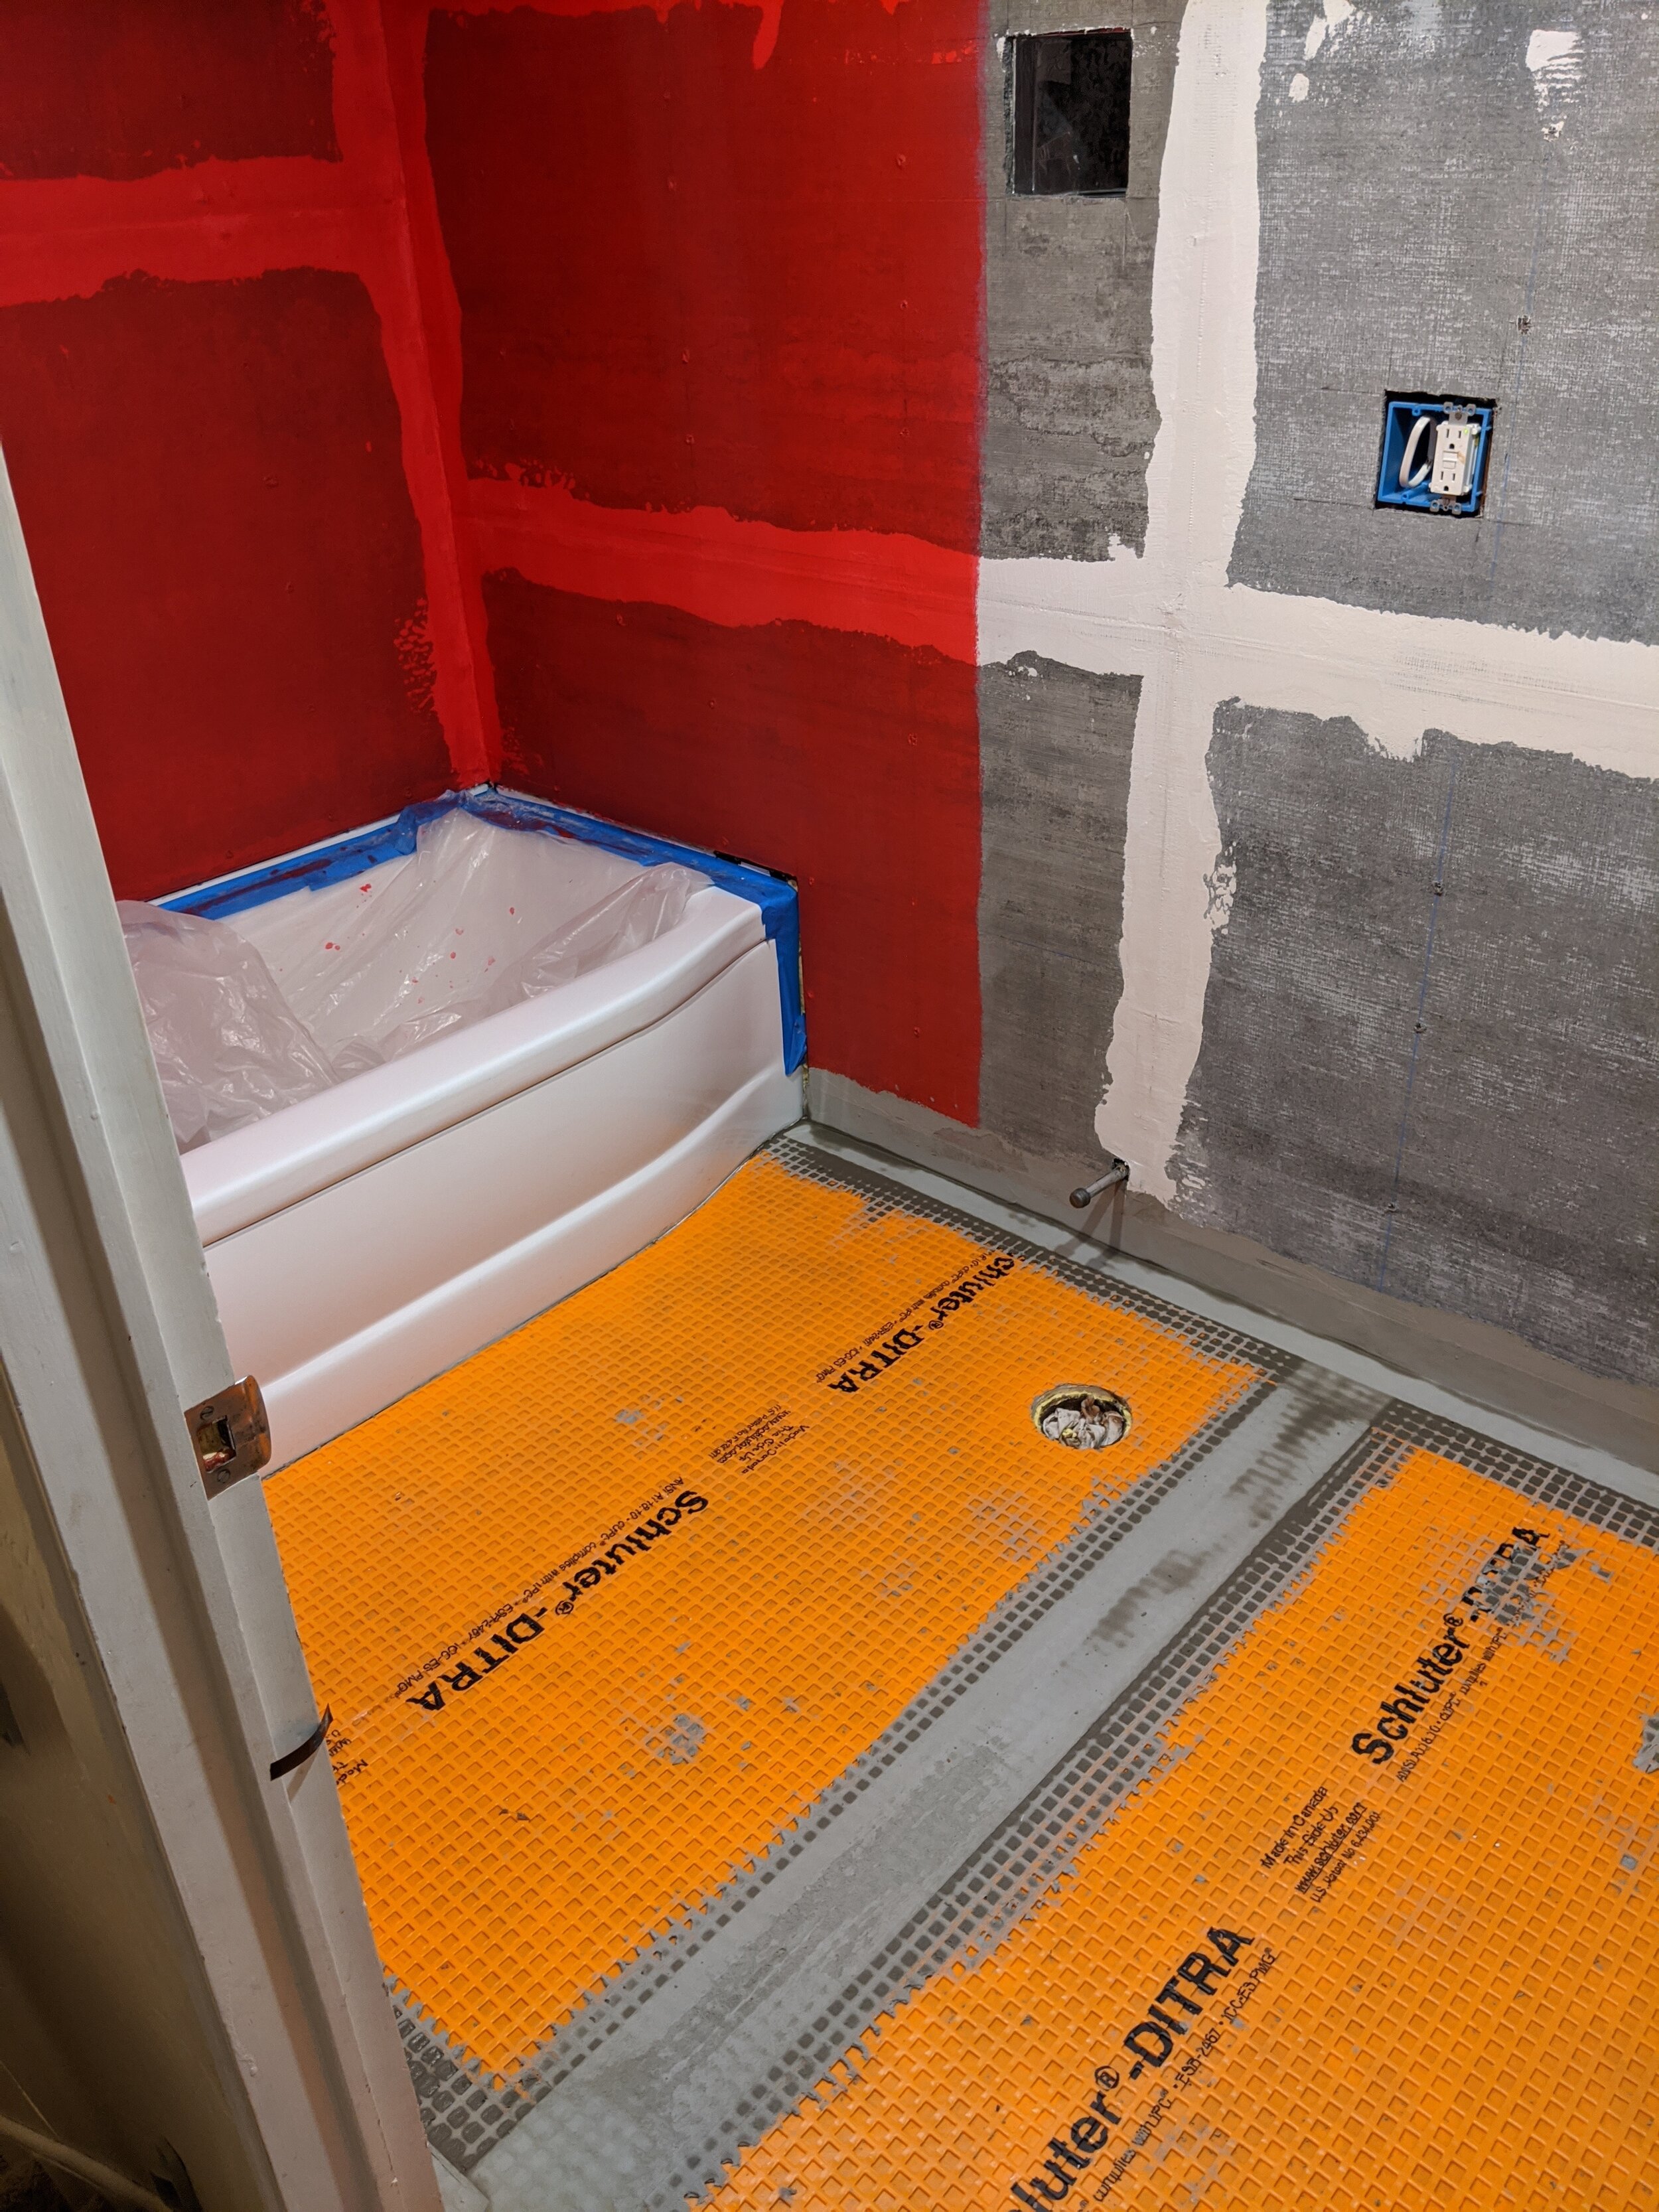
STEP 2: CEILING REMOVAL

In our case, the ceiling was pressboard and needed to come down. We had to have a clean slate to rewire, add new lights, and paint.

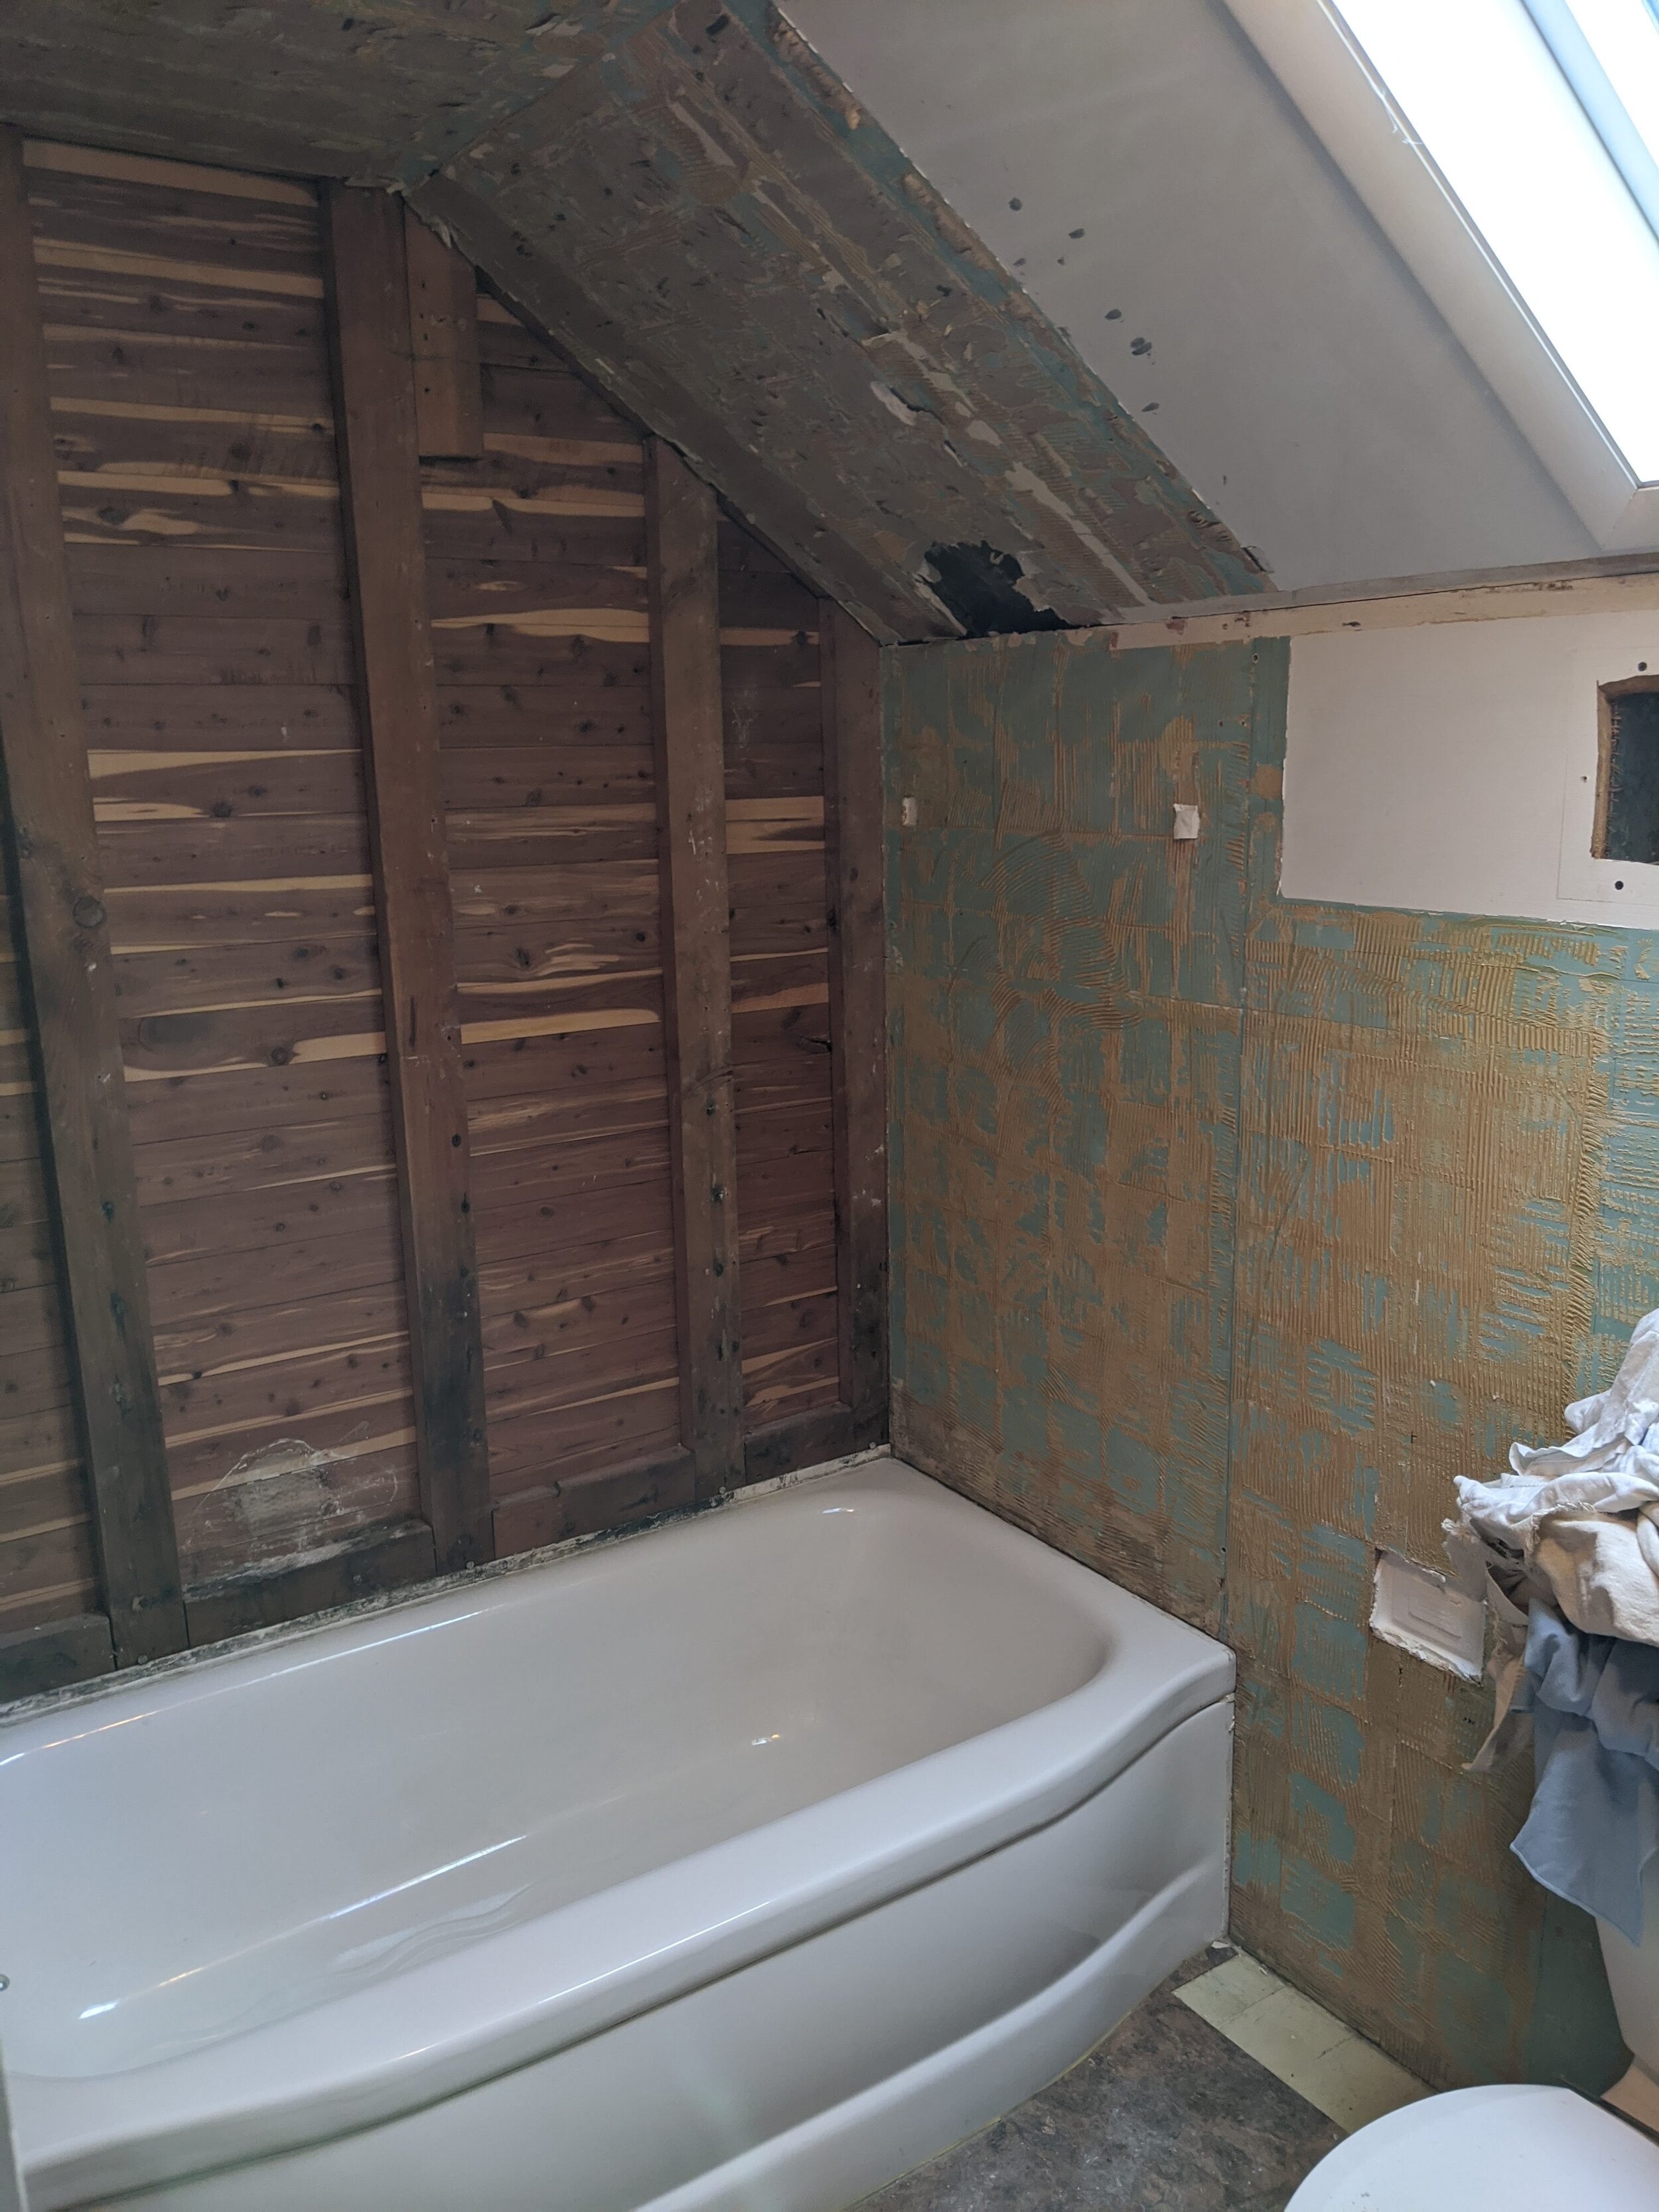
STEP 3: WALL REMOVAL

I’m sure there’s some construction person out there saying “you didn’t remove the wall, you removed the stuff covering the wall.” Potato, po-tah-toe. We took out what should have been drywall but was instead a combination of plywood, pressboard, and something that disintegrated when we tried to remove it. Goodie. These are the joys of working in an old house!

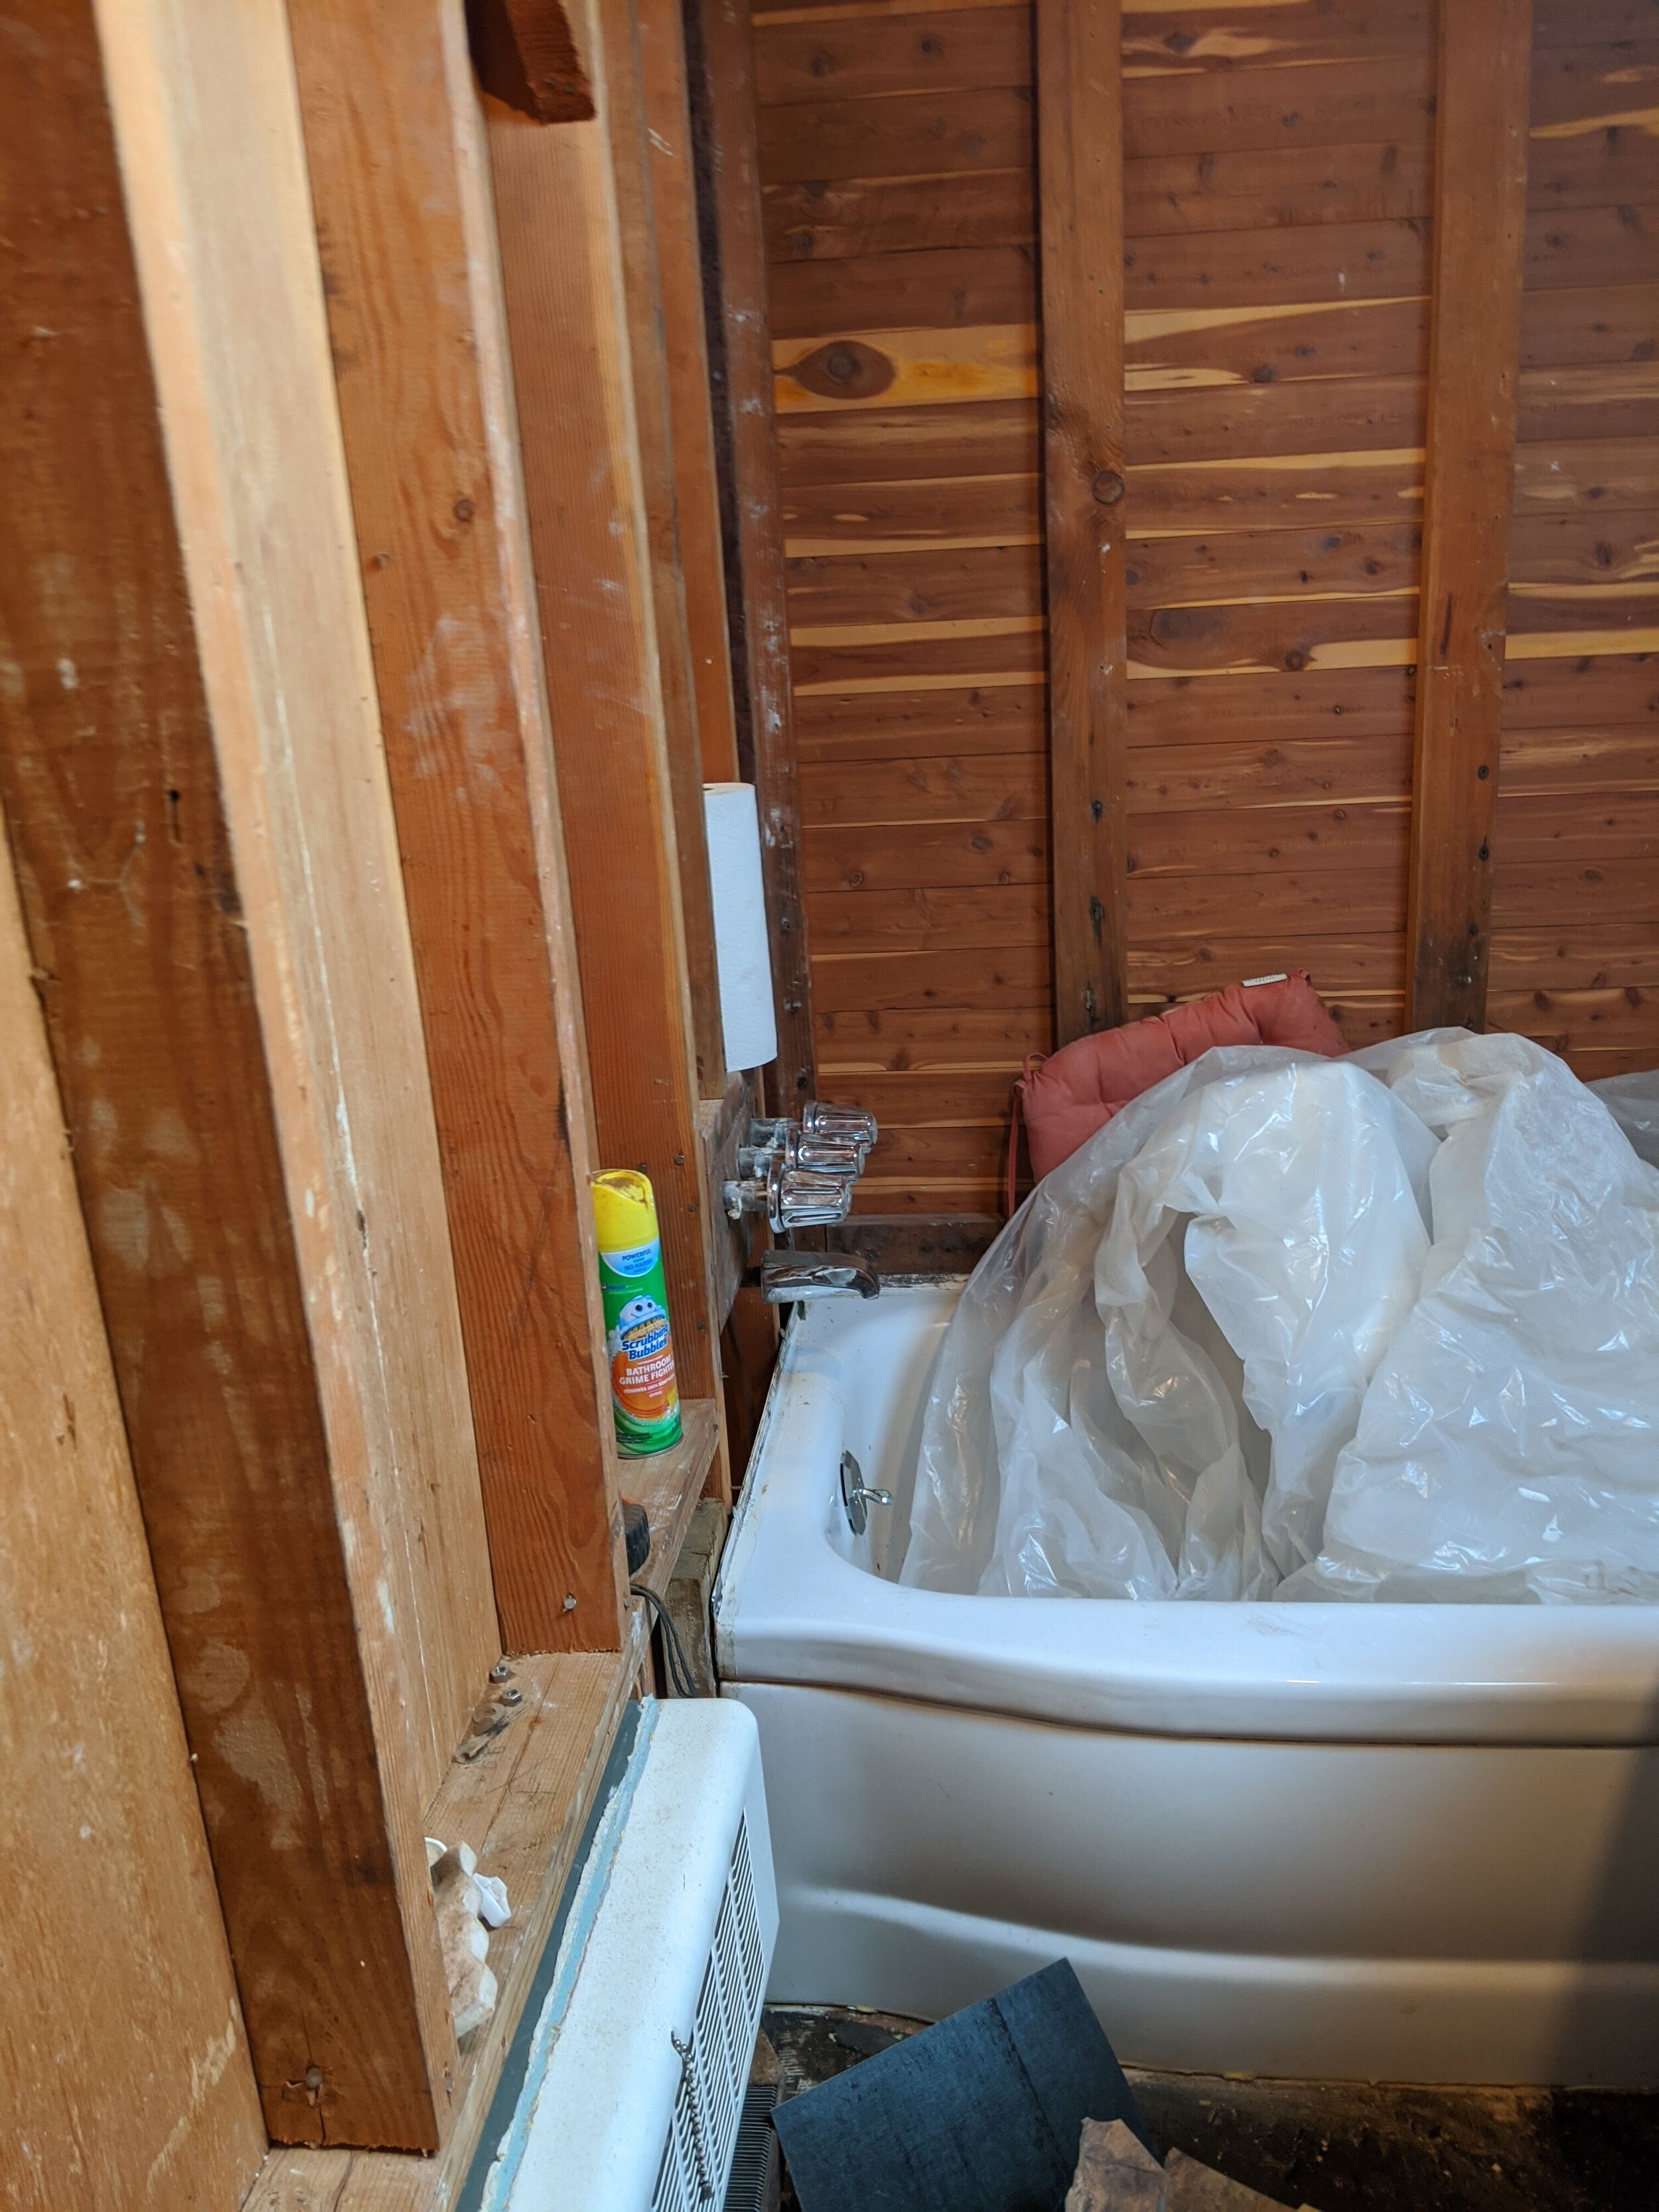
A NOTE ABOUT THE TUB

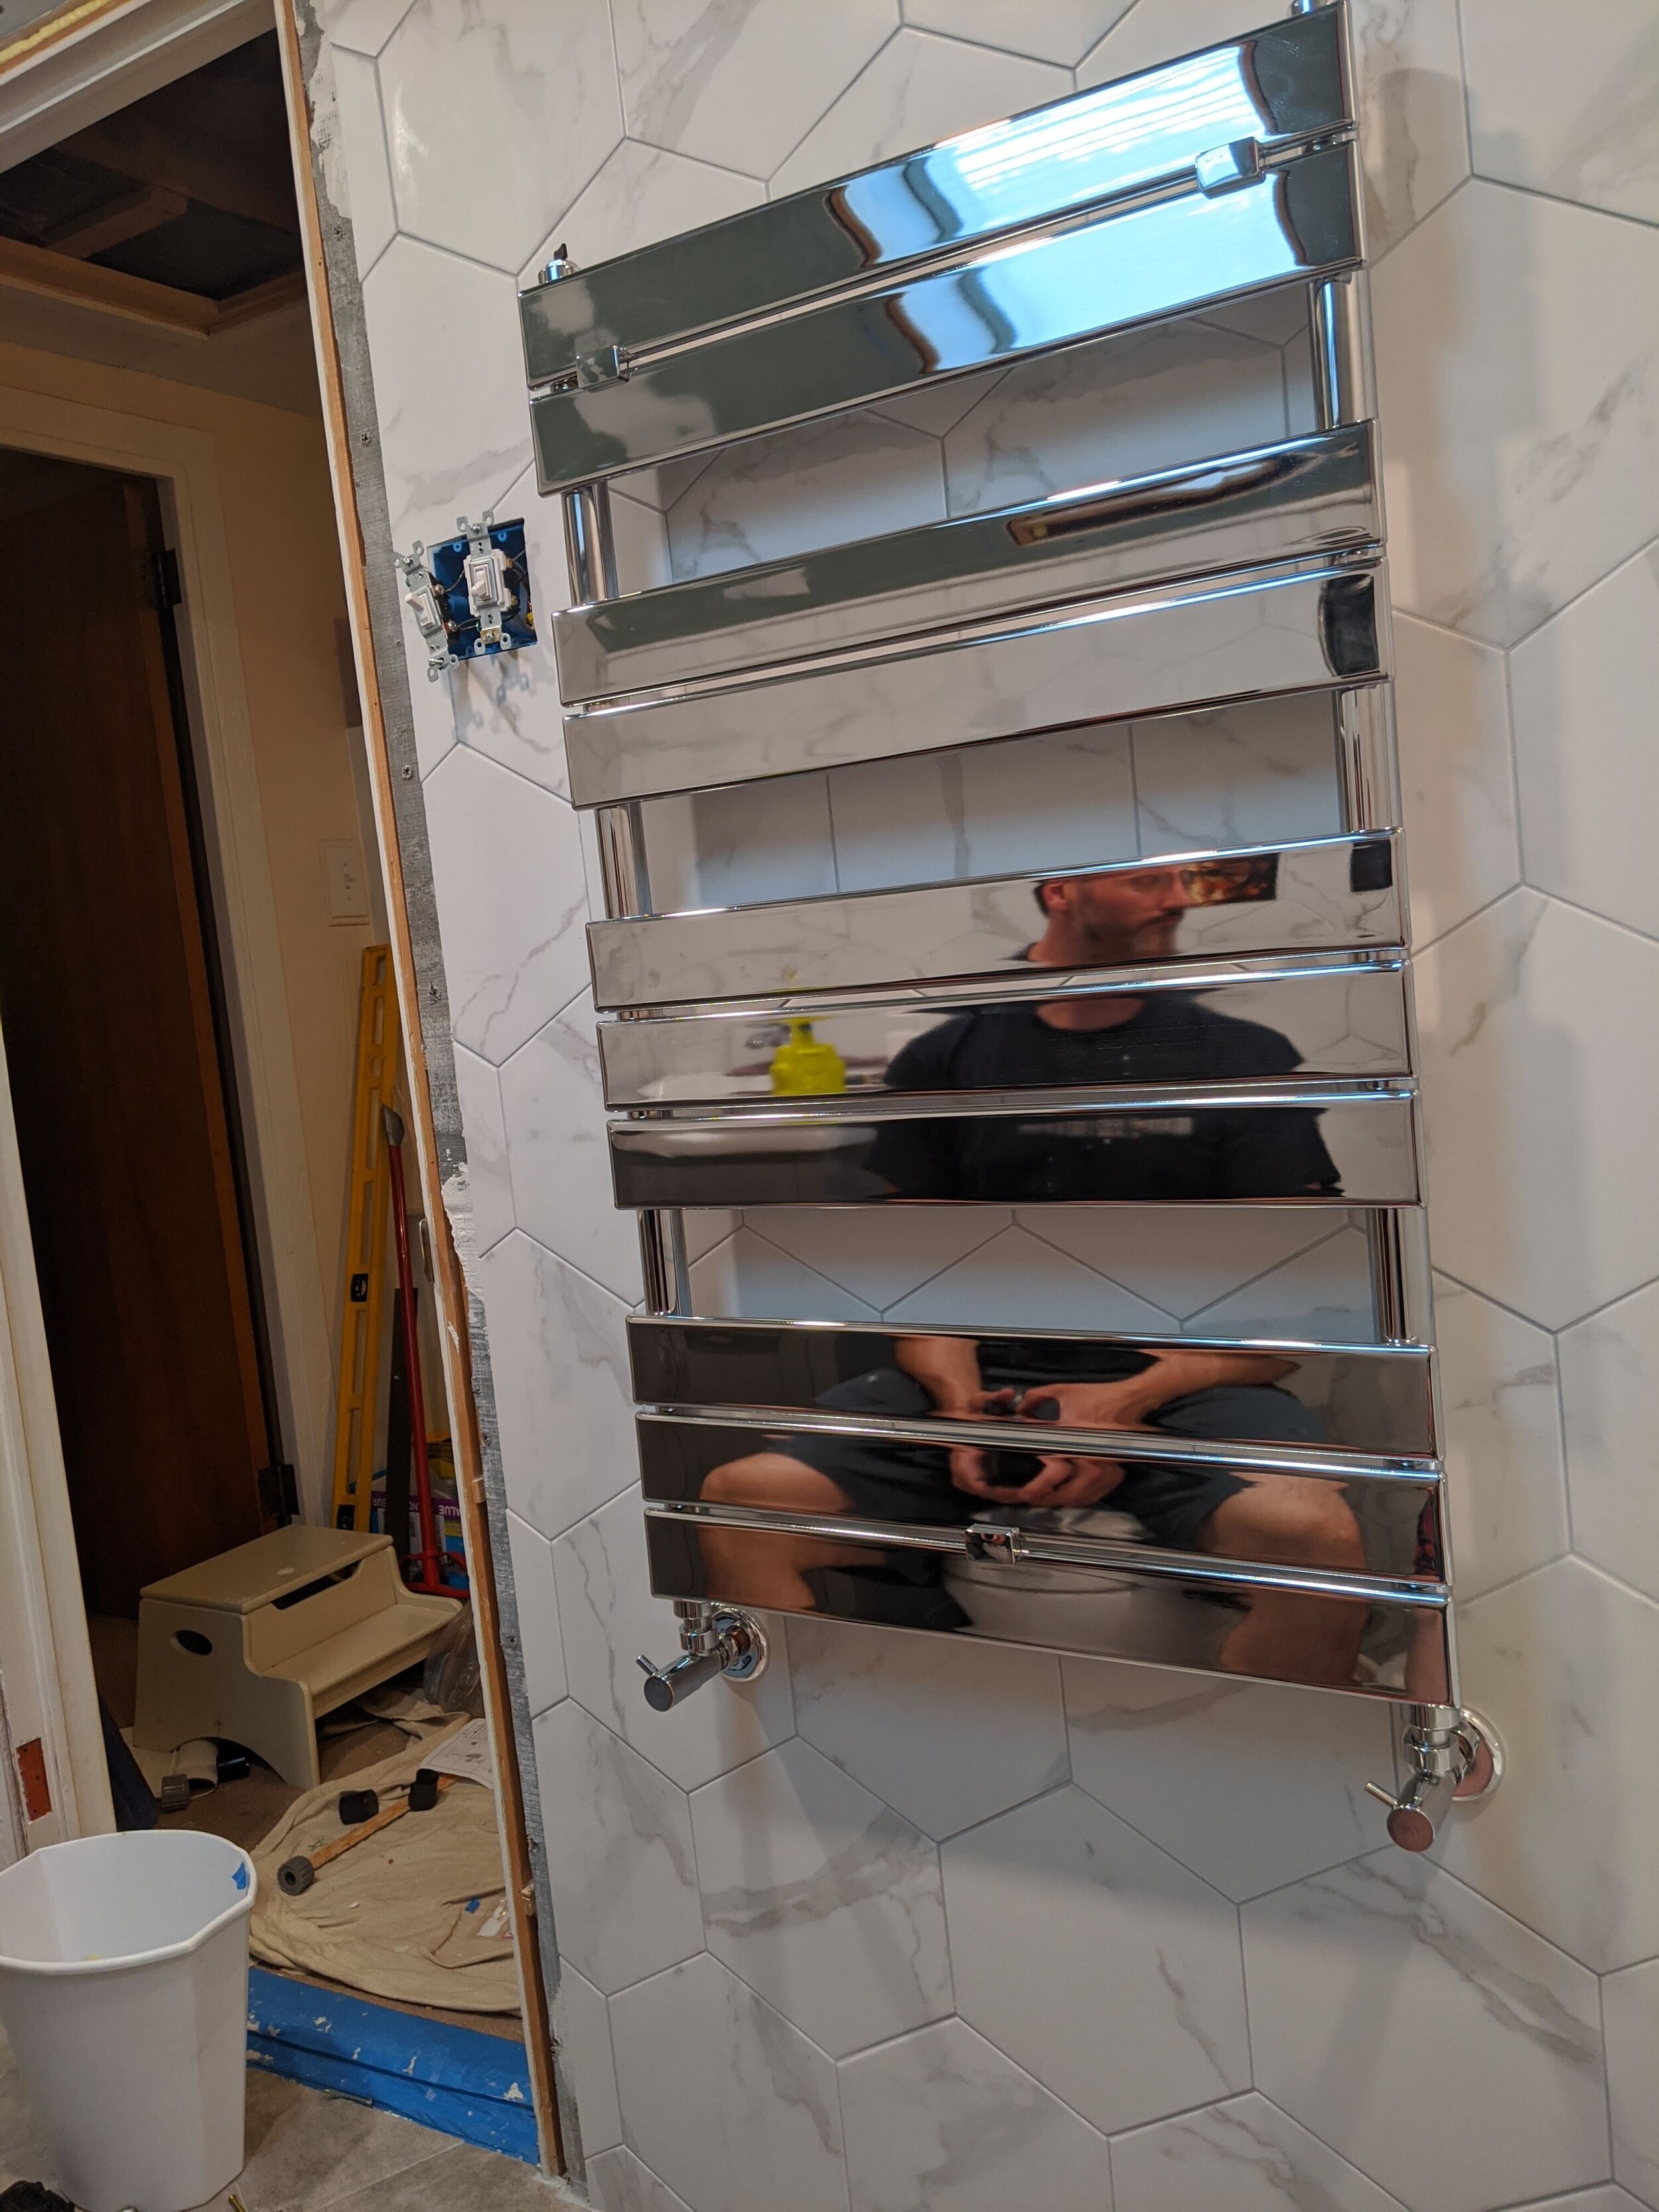
You’ll see in a lot of these pictures that we kept our tub. The heavy duty cast iron tub was actually in great shape, so that stayed. We put new plumbing and hardware in it, and my husband spent an entire Saturday morning getting it leveled to just the right angle so that the water would all go down the drain, PLUS reinforcing it so the squeaks would disappear — but we kept it.

This was one great expense we got to skip. No removal, no yelling PIVOT as we tried to carry it down the stairs — all that was avoided. And it was white! Would have been frustrating to work around a bright pink tub that was installed in the 50s or a yellow tub from the 70s for the design.

 
bathroom-renovation-p1.jpg
 

Click Here to View the Full Blog Archive.      


DIY bathroom reno, start to finish

bathroom-renovation-steps-hor.jpg

Until recently, we had the house with the same upstairs bathroom that your grandma had. (Literally, I think your grandma probably went to the bathroom here.) When we moved in seven years ago, the whole upstairs had been untouched for years since the former occupants were no longer comfortably able to do the stairs due to their age. We ripped out carpet, painted, cleaned, and put in some temporary stopgaps to maintain the bathroom as usable.

Seven years later, we’ve gutted it (literally) and built what I think is a gorgeous, timeless, classy place to pee. (Maybe someday my daughter will take selfies in here, but she just turned one, so let’s table that for a few years.)

THE BEFORE

  • 4” x 4” square white tile

  • White painted walls

  • Bad lighting

  • College dorm-esque shower head

  • Mirror way too low

  • Giant old heater

  • Ugly yellowish wooden doors

  • Sticky (cheap) linoleum 12” x 12” squares on the floor (we put them there in the stopgap mini-reno seven years ago)

  • Old vanity (also painted in the stopgap mini-reno seven years ago)

To overview the steps of the project:

  • Demo tile, ceiling and walls

  • Insulation

  • Demo floor

  • Electrical

  • Rough plumbing

  • Concrete board and drywall

  • Waterproofing shower and floor

  • Tile walls and ceiling

  • Tile floor

  • Install fixtures

  • Finish plumbing

  • Install radiator

  • Install trim

  • Paint everything

  • Re-install doors

  • Finishing touches

My husband has a full-time job, so we did our project over 4 months. We’re lucky another to have two other toilets in the house, so it wasn’t a huge rush. Overall, I really couldn’t be happier with the results. Looking at the pictures, I’m laughing a little at the similarity between my kitchen and bathroom — unintentional. But, hey, I like what I like.

Click forward to see a post for the steps in (much) greater detail.

 
bathroom-renovation-steps.jpg
 

Click Here to View the Full Blog Archive.      


Step-by-step to create your own dimensional wooden wall art

 
IMG_20190711_221515599.jpg

I started seeing these dimensional wooden wall art pieces on Pinterest and fell in love. Bonus was that they promised to help dampen sound! I knew this would be ideal for the wall of my office which already features my eclectic taste in furnishings.

MAKE YOUR PURCHASES

First stop was Home Depot to gather what I needed…

  • 1.5” square dowels

  • Wood glue

  • Wood stain in asundry colors that you love (not paint, that will hide the wooden grain patterns)

  • Sand paper (more than I thought, had to make a second run — get a lot!)

  • Pressboard for the backing

  • Something to hang it. I used 8 heavy-duty Command Velcro strips.

  • Compound mitre saw

My first step was to cut the backer to the size I wanted. Note that you want the edge of the side blocks to stick out just a bit so the backer is covered, but NOT so much that the corner blocks aren’t secure. (See below for a finished view of the back.)

Do some math that leaves the backer about 3/4” smaller than your rows of blocks (split between top and bottom or left and right, that leaves 3/8” hanging off each side). My finished piece is 10 blocks high x 20 blocks wide (10 x 1.5 = 15” and 20 x 1.5" = 30”), so my backer was 14.25” x 29.25".

I’ll remind you of this later, but glue the blocks to the textured side so they have more to grab and leave the smooth side for your wall.

wooden-wall-art.jpg

CUT AND SAND

The next step is the long one — cutting the blocks to various angles. My hubby helped with this because I’m afraid of the compound mitre saw. (Please be a better person than me and do it yourself. Note that he’s extraordinarily offended that this picture somehow looks like his hands are on the blade. They weren’t. Don’t. Do. That.)

The trick here is that one side of every block needs to be square to the vertical sides — and you want to mix it up with different heights from about 1/2” to just under an inch. (Any higher and the overall piece will be way too heavy.)

We managed a system of cutting like this:

  • Cut the entire dowel with straight cuts into pieces varying from 1 to 2 inches.

  • Then, split each of those pieces with a mix of angles (both ways, so a slant and a tilt) from 15 degrees to 35 degrees.

Now, start sanding. Not going to lie, this was the least fun part of the project. I listened to music, but I’m glad I invested the time so the final piece has a professional finish.

After you sand, brush with a damp cloth and get ready to stain.

IMG_20190711_222119249.jpg

STAIN

I already knew I wanted blue and yellow, with white and black added for some color dimension. It’s important here to preserve the cool cut grain of the sides, so test to be sure it isn’t too dark. I discovered that if I used a dark stain but wiped it off right away, I could generate some really faint/deep waves of color in the wood grain that I love.

Determine how much of each color you want and start staining. Most of my squares took two coats, and to mix up the colors, I did some yellow/yellow, some yellow/white, some blue/blue, some blue/white, and some blue/black. Experiment with deepness of the color by leaving the stain on more or less time before you wipe.

For my 200 blocks, I did somewhere around 30 black, 30 white, 20 bright yellow, 20 light yellow, 40 dark blue, 30 medium blue, and 20 light blue. (Don’t count the squares in my picture and tell me I’m bad at counting. Also, that doesn’t equal 200. But it’s art, so that’s ok!)

IMG_20190727_145348845.jpg

MAKE YOUR PATTERN

This is your art! Make your pattern what you want. Mine is representative of a sunrise of a mountain — but only vaguely. I just love the sense of movement in this wave I made. You can be more realistic if you’d like. If you really want to be specific, take a photograph of the thing you like and turn down the resolution on your computer until you can see the pixels. Then you can just copy the pixels to create the image.

For my pattern, I discovered that I liked some areas that felt like the colors were fading (bright yellow to light yellow to white) juxtaposed against other areas where the colors were starkly contrasting (bright yellow next to black).

Once you’re set on the color pattern, start twisting the blocks. If you cut with the compound mitre like we did, you should be able to mix on both axes — the tilt and the slant. Mix it up, twisting until you like what you’re seeing. The idea is to have blocks going different directions.

IMG_20190810_143454821.jpg
IMG_20190811_133953547.jpg

GLUE

Once your pattern is set, start the gluing. Note: Glue the blocks to the textured side of the pressboard so they have more to grab, and leave the smooth side for against your wall.

The shortest blocks will be pesky and try to fool you occasionally so make sure you pay attention and have the square side on the bottom (with the right angles), otherwise you won’t get a neatly structured grid on the top. The slanted/tilted side should always be up. Use a good amount of glue. I glued mine in strips.

Press a level on both sides to make sure you maintain the perfect grid shape. Overhang the edges just enough that the backer is hidden but not so much that the corner doesn’t have enough to grab.

You can’t really weight these from the top (since their heights are all different), so I used the level and some extra dowels pushed tight to the sides and some stretchy straps to make sure it stayed together and tight. No glue drift!

Leave it to dry at least 24 hours.

MOUNT AND HANG

My last phase was the Command Velcro strips. I’m sure you could also hang with a regular picture kit, but I don’t like to mess up my walls since I change things around a lot. Note, this will be heavier than you think, so go ahead and load them up. Full disclosure, the first day I mounted this with 4 strips (after taking the picture with 6). I cheaped out, and it came off the wall around 2 am. (Cue total panic!!) Fortunately, no breakage, because —good glue.

I rehung it with 8 strips (after my breathing returned to normal), and it’s been up for months with no issue.

Couldn’t be happier with my creation! I get compliments on it a lot, mixed in with, “what is that supposed to be?” Then I tell them it’s a sound dampener, and they’re suitably impressed at my ingenuity.


Click Here to View the Full Blog Archive.      


BOOK REVIEW: Struck Down But Not Destroyed

struck-down-h.jpg

Anxiety is complex to understand, both for the person experiencing it and for their loved ones. I don’t personally struggle with anxiety, but several key and beloved people in my life live this struggle daily. At the recommendation of a friend, I decided to tackle Pierce Taylor Hibbs’ book for the sake of learning more about their journey.

I’ll be honest — the anxiety of the people I love is often confusing to me. I love them, and I want to understand — but I can’t. This book, Struck Down But Not Destroyed, is written for people of faith suffering with anxiety or those living with someone who deals with this mental health challenge. It is written from a Christian perspective and begins by addressing some common misconceptions. He directly addresses nonsense those with anxiety might hear such as this is a punishment for sin, that if you lived with more faith the anxiety would disappear, or that using medication means you are not fully relying on God. This seems elementary, but the misinformation spread by (sometimes) well-meaning people can have devastating effects. I think of some of the lies that have been spoken to me in my areas of weakness, and I shudder to imagine the devastation that someone already struggling with anxiety would feel to be told it’s their own fault.

For the rest of the book, the author spells out many of the coping mechanisms that have been instrumental in helping him deal with his anxiety disorder. He tells many personal stories and explains in detail his experiences and the way he felt physically, spiritually, mentally, and emotionally. He talks about being acutely aware of his breathing, of adrenaline rushes, and feeling like his throat was closing. These visceral details offered me great insight into the experience of an anxiety 'attack,' as well as the everyday challenges that others around him don't even notice typically. Others might only recall “Piece has anxiety” when he’s having an “attack,” but it’s something he’s aware of nearly all the time.

The author emphasizes the power of prayer and the support of his wife and family. His thesis is, "We are crushed to be called." He would seem to state that in any difficulty or challenge, God can bring us closer to Him. The author postulates that anxiety is no different and uses scripture, his own experience, and practical theology to construct a six-point plan for handling anxiety as a tool to draw closer to the Lord. He shares the acronym CHRIST to be helpful: consider the feelings as spiritual medicine, He knows, remember the promise, identify a focus, stay engaged, and talk.

I cannot recommend this to anyone who personally lives with anxiety, because that is not my life experience. I feel like that would be akin to recommending the best caramel candy when I don’t eat caramel. So I’ll simply say that I found this book helpful in better understanding the complex journey of someone who lives with this challenge.

 
struck-down-v.jpg
 

Click Here to View the Full Blog Archive.      


foster care and social distancing

Life is so weird right now. We’re all in a strange movie. It’s lonely and boring, but we’re making it work… because we’re aware of how much worse it could, and might, get.

foster-care-and-social-distancing-h.jpg

So, how is foster care different under social distancing and self-quarantine and generally living in a COVID-19 world?

  1. Courts are closed. Along with basically everything else, family courts are mostly closed. Emergencies are still being tended to, but a lot of things are getting ‘reviewed’ or ‘continued’ — basically a bunch of paperwork gets shuffled around but nothing changes. The heavy back log that most courts already deal with is only going to get worse. Adoptions that families have been counting down to for months, even years, have been postponed.

  2. Visitation is suspended. For families separated during this time, I can only imagine how much scarier this situation is. Many caseworkers are trying to do digital visits for bio parents to ‘see’ their kids, but we all know it isn’t the same. Siblings who are in different homes aren’t able to connect the same way, despite video chats.

  3. Home visits are digital. Caseworkers are calling foster parents on Skype, Zoom, Google Hangouts, and even Facebook messenger to check in. They watch us play, and I pan the camera around her bedroom so they can do their safety check through the screen.

  4. We are getting a lot of mail. And email. Like, a lot. This policy has been changed; that new policy has been updated; the state has modified its recent recommendation; the CDC has asked that we remind you; the news reports you’re hearing may recommend; we’re now suggesting that…

  5. (Hopefully) we are meeting our goal of keeping kids safe. While I won’t pretend that foster care is an ideal situation for everyone, everyone seems to agree that the best thing for each individual and for society as a whole is to isolate for the time being. Talk to your kids about the realities we face, teach them good habits of health, and pray together for the countless people suffering under this awful plague.

    So, stay with your own crew, wash your hands, and look for ways you can love each other and flourish in this strange and unprecedented moment in history.

 
foster-care-and-social-distancing-v.jpg

Read more…


Click Here to View the Full Blog Archive.